Spring Cloud Alibaba 入门级实践
文章由本人阅读Spring Cloud Alibaba官方文档时总结而成,一切以官方描述为准。
项目源码:https://github.com/WanAnUncommon/SpringCloudAlibabaDemo
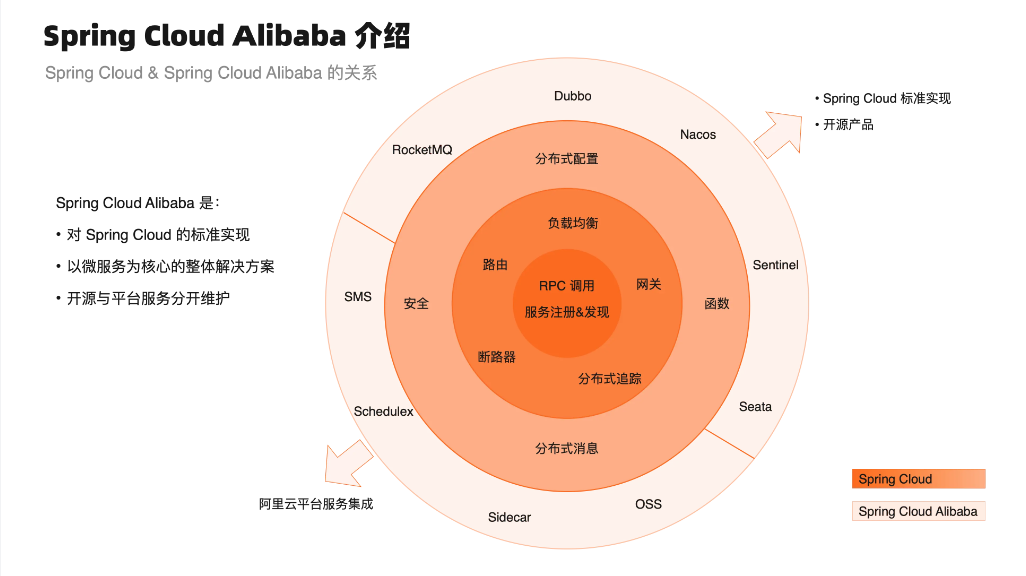
Spring Cloud 是什么?
我们知道,如果要实现一个分布式系统,需要引入各种组件,来实现网关、服务发现、配置中心、限流等功能。如果每一个组件都需要我们手动下载、编写配置文件、适配原生API,那就太麻烦了。既然一个单体项目可以通过Spring Boot整合各种组件实现快速开发,那么,自然可以有一个框架整合网关、服务发现、配置中心、限流等组件来实现分布式项目的快速开发。Spring Cloud应运而生。
Spring Cloud是一套规范,主流的微服务组件都遵循了这套规范,我们就可以便捷的通过Spring Cloud来统筹一个分布式系统所需要的网关、服务发现、配置中心、限流等组件。
Spring Cloud Alibaba 是什么?
Spring Cloud致力于统筹所有的微服务组件,想要为所有的微服务组件都提供同一个开发规范,但是,实际项目开发中,往往需要具体问题具体分析,针对特定的场景,对某些组件进行优化。
Netflix开发了Spring Cloud Netflix,主要针对Eureka、Ribbon、Feign、Hystrix等组件进行了优化。但是慢慢的,Netflix不再维护Spring Cloud Netflix了。
Alibaba开发了Spring Cloud Alibaba,主要针对Nacos、Sentinel、Seata等组件进行了优化。Spring Cloud Alibaba慢慢的取代了Spring Cloud Netflix,成为目前主流的分布系统开发框架。
 [Spring Cloud Alibaba](https://sca.aliyun.com/docs/2023/overview/what-is-sca/?spm=5176.29160081.0.0.74805c72Cn8wbR)
Spring Cloud Alibaba也是国内首个进入Spring社区的开源项目。2018年7月,Spring Cloud Alibaba正式开源,并进入Spring Cloud孵化器中孵化;2019年7月,Spring Cloud官方宣布Spring Cloud Alibaba毕业,并将仓库迁移到Alibaba Github OSS下。
服务发现与配置中心:Nacos
“服务发现”是什么?
对于一个单体项目,一个方法想要使用另一个方法,只需要正常的方法调用就行。但是,对于一个分布式系统,两个方法可能分布在不同的服务器,那么一个方法就需要先知道另一个方法的IP、端口等基本信息才能进行调用。如果直接将其他服务器上方法的基本信息记录在自己的服务器上,那么一个分布式系统的模块间的耦合度就太高了,不便于维护。
所以,需要有一个统一的服务,不同模块将自己需要暴露出去的接口信息注册到这个服务中,那么,一个模块中的方法想要调用其他模块中的方法时,只需要到这个服务中去查询一下,就可以得到IP、端口等信息,然后就可以去调用方法了。这个服务就叫“服务发现”,或者“服务注册与发现”。
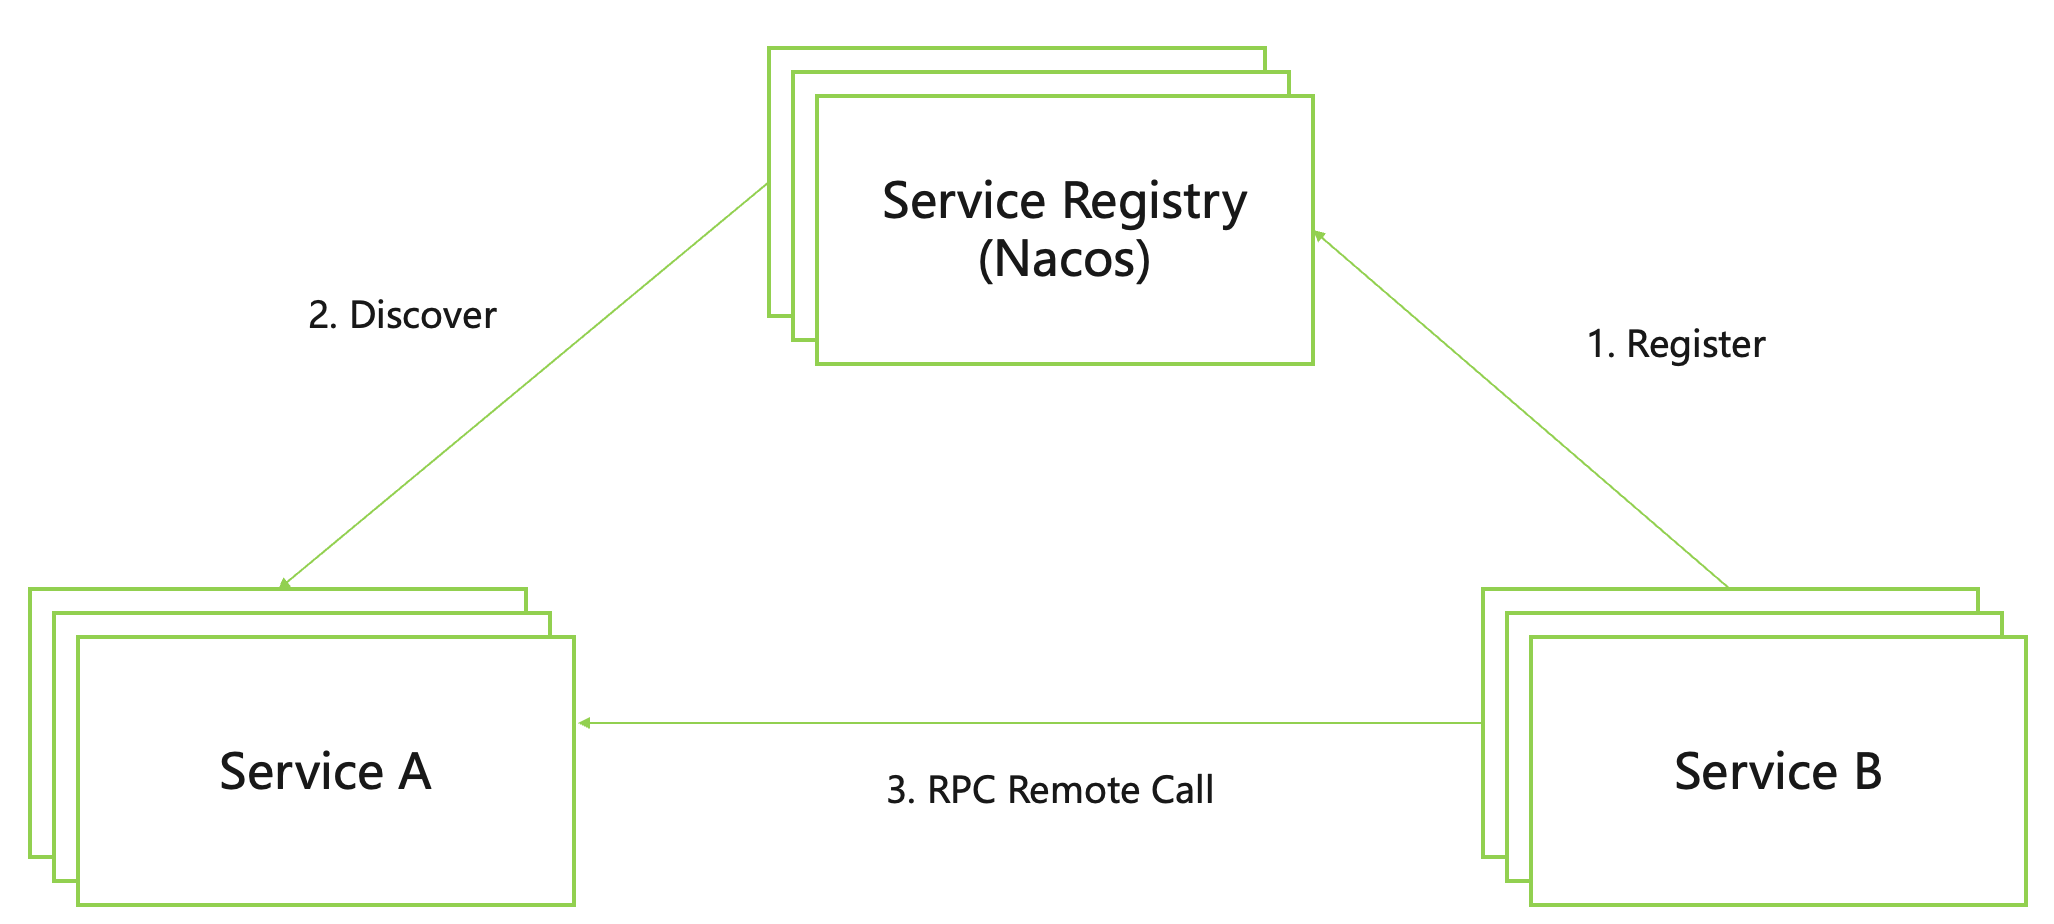
Spring Cloud Alibaba通过Nacos实现服务发现。
 [Spring Cloud Alibaba](https://sca.aliyun.com/docs/2025.x/user-guide/nacos/overview/?spm=5176.29160081.0.0.74805c72Cn8wbR)
如上图所示,所有的微服务应用在启动过程中会将自身包含服务名称、主机IP地址和端口号等信息发送到注册中心中,然后服务调用方根据服务名称到注册中心中查找对应服务的所有实例IP地址和端口号来进行服务调用。从而让分散的微服务系统之间能像一个整体一样进行交互。
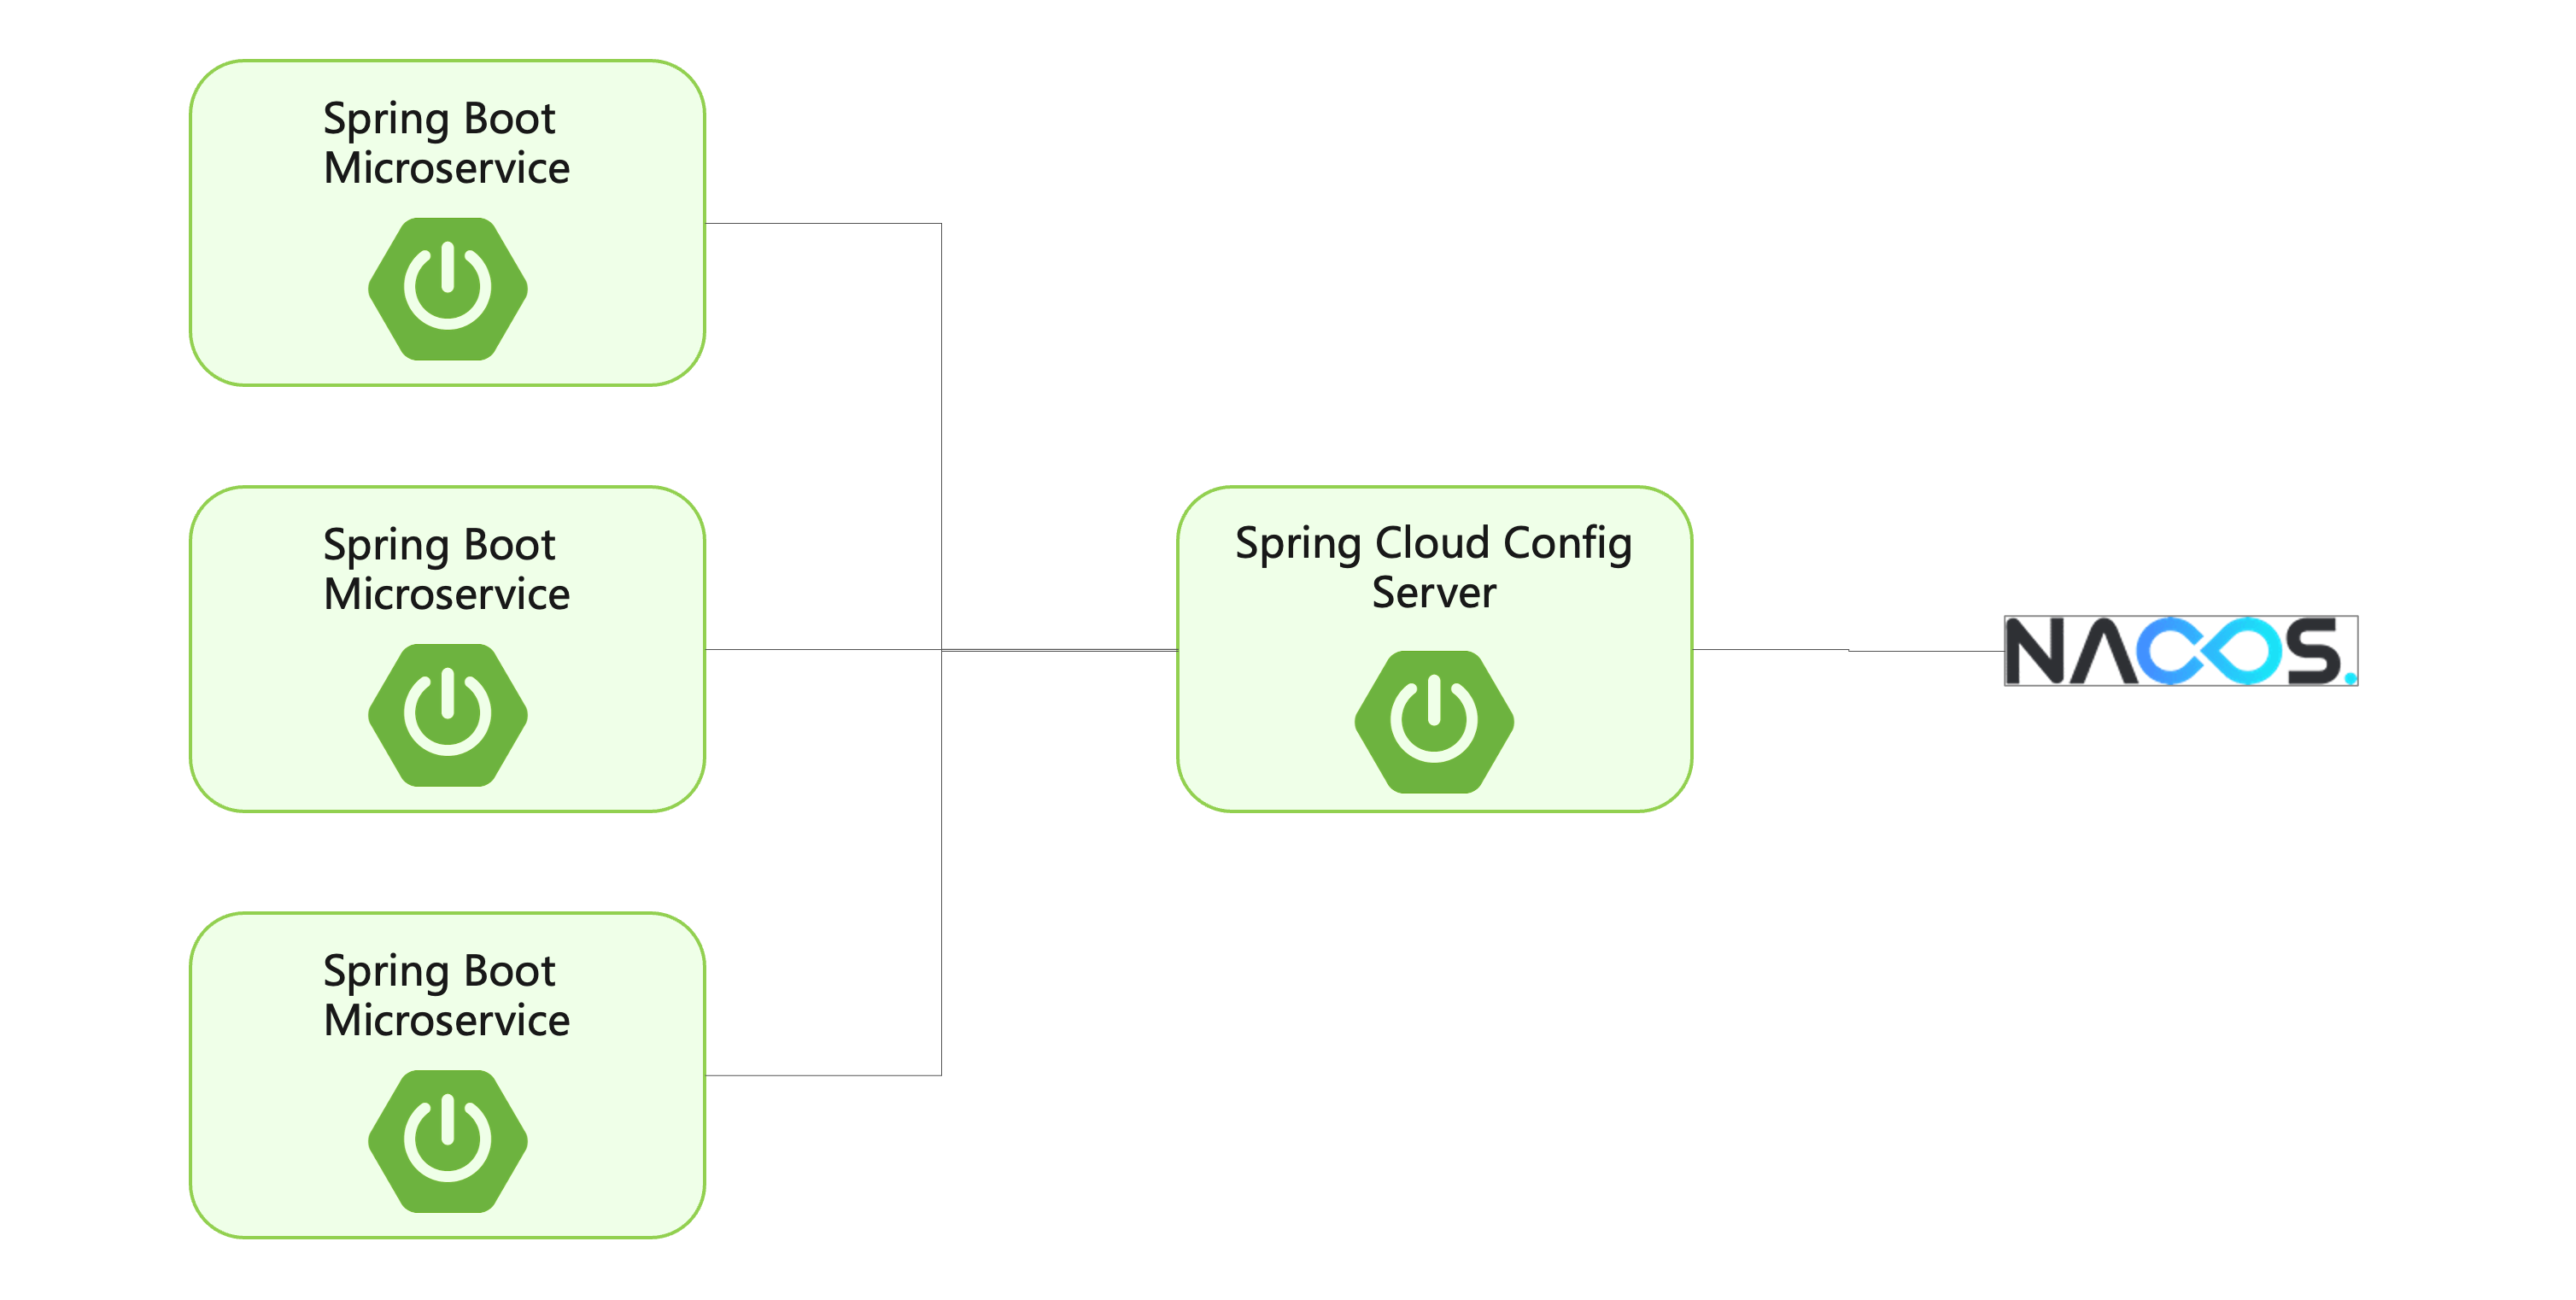
“配置中心”是什么?
一个项目中,会有很多配置信息,例如数据库连接字符串、日志级别等,如果想要更换数据库,就需要修改配置文件,然后重新打包、部署项目。对于单体项目,还可以忍受,但是对于一个分布式项目,可能涉及多个模块,每个模块都需要重新打包、部署,这就太不利于维护了。
所以,需要有一个统一的服务,将项目中主要的配置信息交给这个服务来维护,项目动态地从该服务中拉取配置信息。这个服务就叫“配置中心”。
Spring Cloud Alibaba通过Nacos实现配置中心。
 [Spring Cloud Alibaba](https://sca.aliyun.com/docs/2025.x/user-guide/nacos/overview/?spm=5176.29160081.0.0.74805c72Cn8wbR)
配置中心在分布式场景中可以帮助解决以下问题:
- 管理应用程序配置:当有大量应用程序需要管理时,手动维护配置文件会变得非常困难。分布式配置中心提供了一个集中管理和发布配置信息的解决方案。
- 环境隔离:在开发、测试和生产等不同环境中,应用程序的配置信息往往都会有不同。使用分布式配置中心,可以轻松的管理和分发不同环境下的配置信息。
- 提高程序安全性:将配置信息存储在代码库或应用程序文件中可能会导致安全风险,因为这些信息可能会被意外地泄露或被恶意攻击者利用。使用分布式配置,可以将配置信息加密和保护,并且可以进行访问权限控制。
- 动态更新配置:在应用程序运行时,可能需要动态地更新配置信息,以便应用程序可以及时响应变化。使用分布式配置中心,可以在运行时动态更新配置信息,而无需重新启动应用程序。
Nacos实战
Nacos /nɑ:k əʊs/ (Dynamic Naming and Configuration Service)是一个更易于构建云原生应用的动态服务发现、配置管理和服务管理平台。
本地安装Nacos
在Nacos官网下载稳定版本的二进制包(这里下载的是Spring Cloud Alibaba 2022.x推荐
的2.2.3版本):
下载完成后,解压缩对应的nacos-server-2.2.3.zip压缩包
在解压缩后的nacos/conf/application.properties文件中配置数据源及鉴权信息:
1
2
3
4
5
6
7
8
9
10
11
12
13
14
15
16
17
18
19
#*************** Config Module Related Configurations ***************#
### If use MySQL as datasource:
### Deprecated configuration property, it is recommended to use `spring.sql.init.platform` replaced.
# spring.datasource.platform=mysql
spring.sql.init.platform=mysql
### Count of DB:
db.num=1
### Connect URL of DB:
db.url.0=jdbc:mysql://127.0.0.1:3306/nacos?characterEncoding=utf8&connectTimeout=1000&socketTimeout=3000&autoReconnect=true&useUnicode=true&useSSL=false&serverTimezone=UTC
db.user.0=root
db.password.0=2469
### Connection pool configuration: hikariCP
db.pool.config.connectionTimeout=30000
db.pool.config.validationTimeout=10000
db.pool.config.maximumPoolSize=20
db.pool.config.minimumIdle=21
2
3
4
5
6
7
8
9
10
11
12
13
14
15
16
17
18
19
20
21
22
23### The auth system to use, currently only 'nacos' and 'ldap' is supported:
nacos.core.auth.system.type=nacos
### If turn on auth system:
nacos.core.auth.enabled=true
### Turn on/off caching of auth information. By turning on this switch, the update of auth information would have a 15 seconds delay.
nacos.core.auth.caching.enabled=true
### Since 1.4.1, Turn on/off white auth for user-agent: nacos-server, only for upgrade from old version.
nacos.core.auth.enable.userAgentAuthWhite=false
### Since 1.4.1, worked when nacos.core.auth.enabled=true and nacos.core.auth.enable.userAgentAuthWhite=false.
### The two properties is the white list for auth and used by identity the request from other server.
nacos.core.auth.server.identity.key=nacos
nacos.core.auth.server.identity.value=nacos
### worked when nacos.core.auth.system.type=nacos
### The token expiration in seconds:
nacos.core.auth.plugin.nacos.token.cache.enable=false
nacos.core.auth.plugin.nacos.token.expire.seconds=18000
### The default token (Base64 String):
nacos.core.auth.plugin.nacos.token.secret.key=SecretKey012345678901234567890123456789012345678901234567890123456789在连接的MySQL数据库中创建nacos库,并且在该库内执行nacos/conf/mysql-schema.sql文件,进行数据库初始化
然后在nacos/bin目录下通过cmd命令行运行
startup.cmd -m standalone启动Nacos单机模式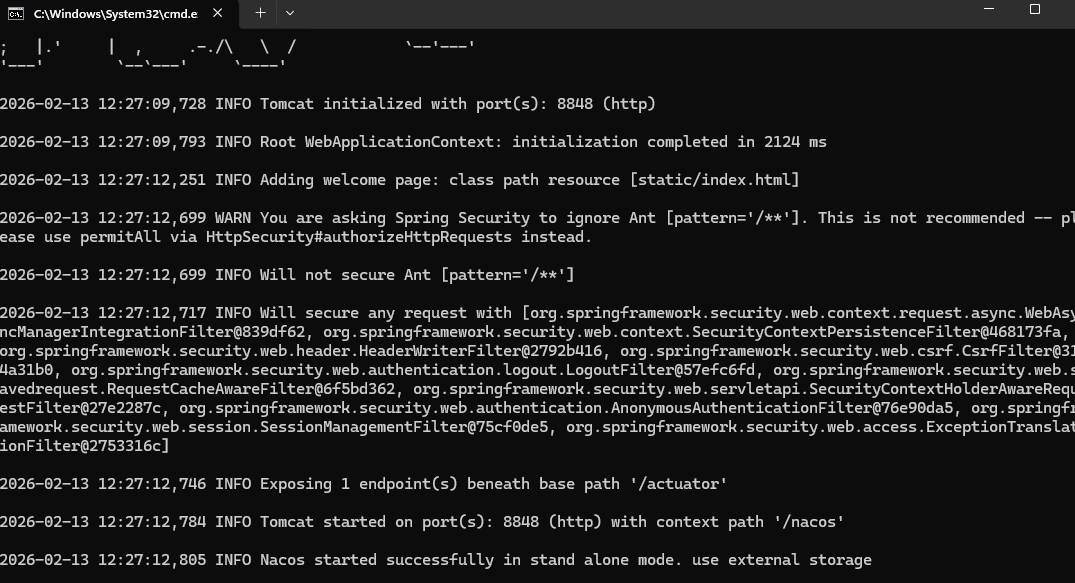
运行成功后,可以在浏览器访问Nacos控制台:http://127.0.0.1:8848
默认账号:nacos 密码:nacos
项目接入Nacos Config
新建一个Spring Boot项目:
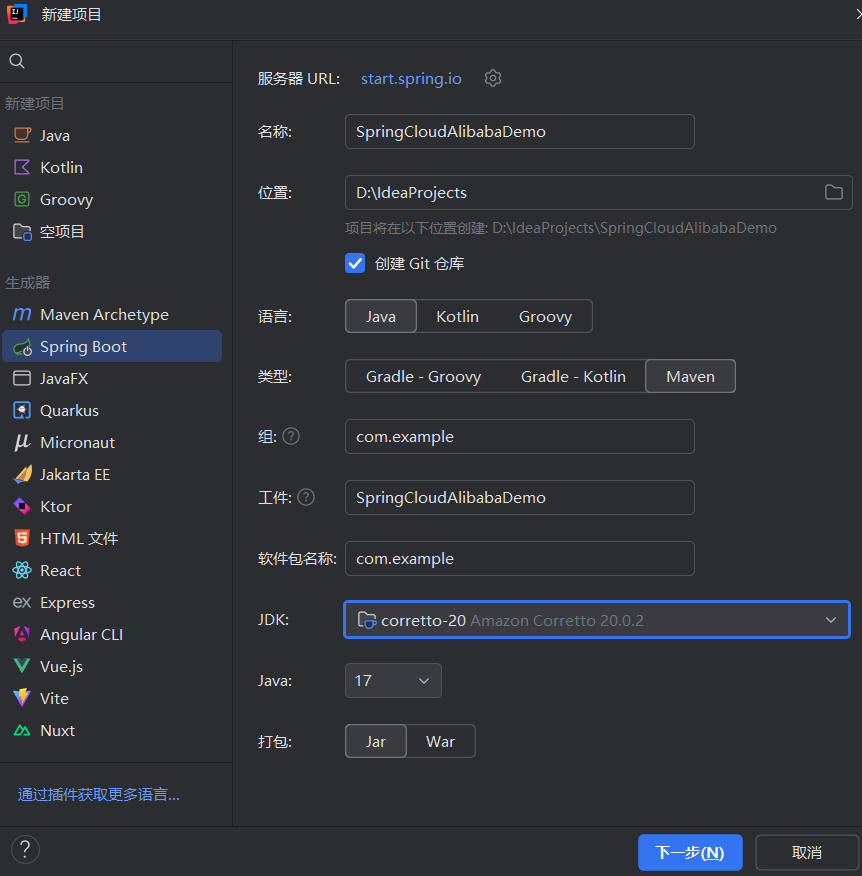
我的idea最低支持SpringBoot3.5.10,但是Spring Cloud Alibaba最多支持SpringBoot3.0.2,所以在pom.xml文件中改为3.0.2版本
引入Spring Cloud Alibaba依赖:
1
2
3
4
5
6
7
8
9
10
11
12
13
14
15
16
17
18
19
20
21
22
23
24
25
26
27
28
29
30
31
32
33
34
35
36
37
38
39
40
41
42
43
44
45
46
47
48
49
50
51
52
53
54
55
56
57
58
59
60
61<?xml version="1.0" encoding="UTF-8"?>
<project xmlns="http://maven.apache.org/POM/4.0.0" xmlns:xsi="http://www.w3.org/2001/XMLSchema-instance"
xsi:schemaLocation="http://maven.apache.org/POM/4.0.0 https://maven.apache.org/xsd/maven-4.0.0.xsd">
<modelVersion>4.0.0</modelVersion>
<groupId>com.example</groupId>
<artifactId>SpringCloudAlibabaDemo</artifactId>
<version>0.0.1-SNAPSHOT</version>
<packaging>pom</packaging>
<properties>
<spring-boot.version>3.0.2</spring-boot.version>
<spring-cloud-alibaba.version>2022.0.0.0</spring-cloud-alibaba.version>
<spring-cloud.version>2022.0.0</spring-cloud.version>
<java.version>20</java.version>
</properties>
<modules>
<module>NacosConfig</module>
</modules>
<dependencyManagement>
<dependencies>
<dependency>
<groupId>org.springframework.boot</groupId>
<artifactId>spring-boot-dependencies</artifactId>
<version>${spring-boot.version}</version>
<type>pom</type>
<scope>import</scope>
</dependency>
<dependency>
<groupId>org.springframework.cloud</groupId>
<artifactId>spring-cloud-dependencies</artifactId>
<version>${spring-cloud.version}</version>
<type>pom</type>
<scope>import</scope>
</dependency>
<dependency>
<groupId>com.alibaba.cloud</groupId>
<artifactId>spring-cloud-alibaba-dependencies</artifactId>
<version>${spring-cloud-alibaba.version}</version>
<type>pom</type>
<scope>import</scope>
</dependency>
</dependencies>
</dependencyManagement>
<build>
<pluginManagement>
<plugins>
<plugin>
<groupId>org.springframework.boot</groupId>
<artifactId>spring-boot-maven-plugin</artifactId>
<version>${spring-boot.version}</version>
</plugin>
</plugins>
</pluginManagement>
</build>
</project>删除src目录。
创建子模块NacosConfig。
在NacosConfig模块的pom.xml文件中添加nacos-config的依赖:
1
2
3
4
5
6
7
8
9
10
11
12
13
14
15
16
17
18
19
20
21
22
23
24
25
26
27
28
29
30
31
32
33
34
35<?xml version="1.0" encoding="UTF-8"?>
<project xmlns="http://maven.apache.org/POM/4.0.0" xmlns:xsi="http://www.w3.org/2001/XMLSchema-instance"
xsi:schemaLocation="http://maven.apache.org/POM/4.0.0 https://maven.apache.org/xsd/maven-4.0.0.xsd">
<modelVersion>4.0.0</modelVersion>
<parent>
<groupId>com.example</groupId>
<artifactId>SpringCloudAlibabaDemo</artifactId>
<version>0.0.1-SNAPSHOT</version>
<relativePath>../pom.xml</relativePath>
</parent>
<artifactId>NacosConfig</artifactId>
<dependencies>
<dependency>
<groupId>org.springframework.boot</groupId>
<artifactId>spring-boot-starter-web</artifactId>
</dependency>
<dependency>
<groupId>com.alibaba.cloud</groupId>
<artifactId>spring-cloud-starter-alibaba-nacos-config</artifactId>
</dependency>
</dependencies>
<build>
<plugins>
<plugin>
<groupId>org.springframework.boot</groupId>
<artifactId>spring-boot-maven-plugin</artifactId>
</plugin>
</plugins>
</build>
</project>在resources/application.yaml中配置nacos-config:
1
2
3
4
5
6
7
8
9
10
11
12
13
14
15
16
17
18spring:
application:
name: NacosConfig
cloud:
nacos:
serverAddr: 127.0.0.1:8848
username: nacos
password: nacos
config:
import:
- nacos:nacos-config-example.properties?refreshEnabled=true
server:
port: 18084
management:
endpoints:
web:
exposure:
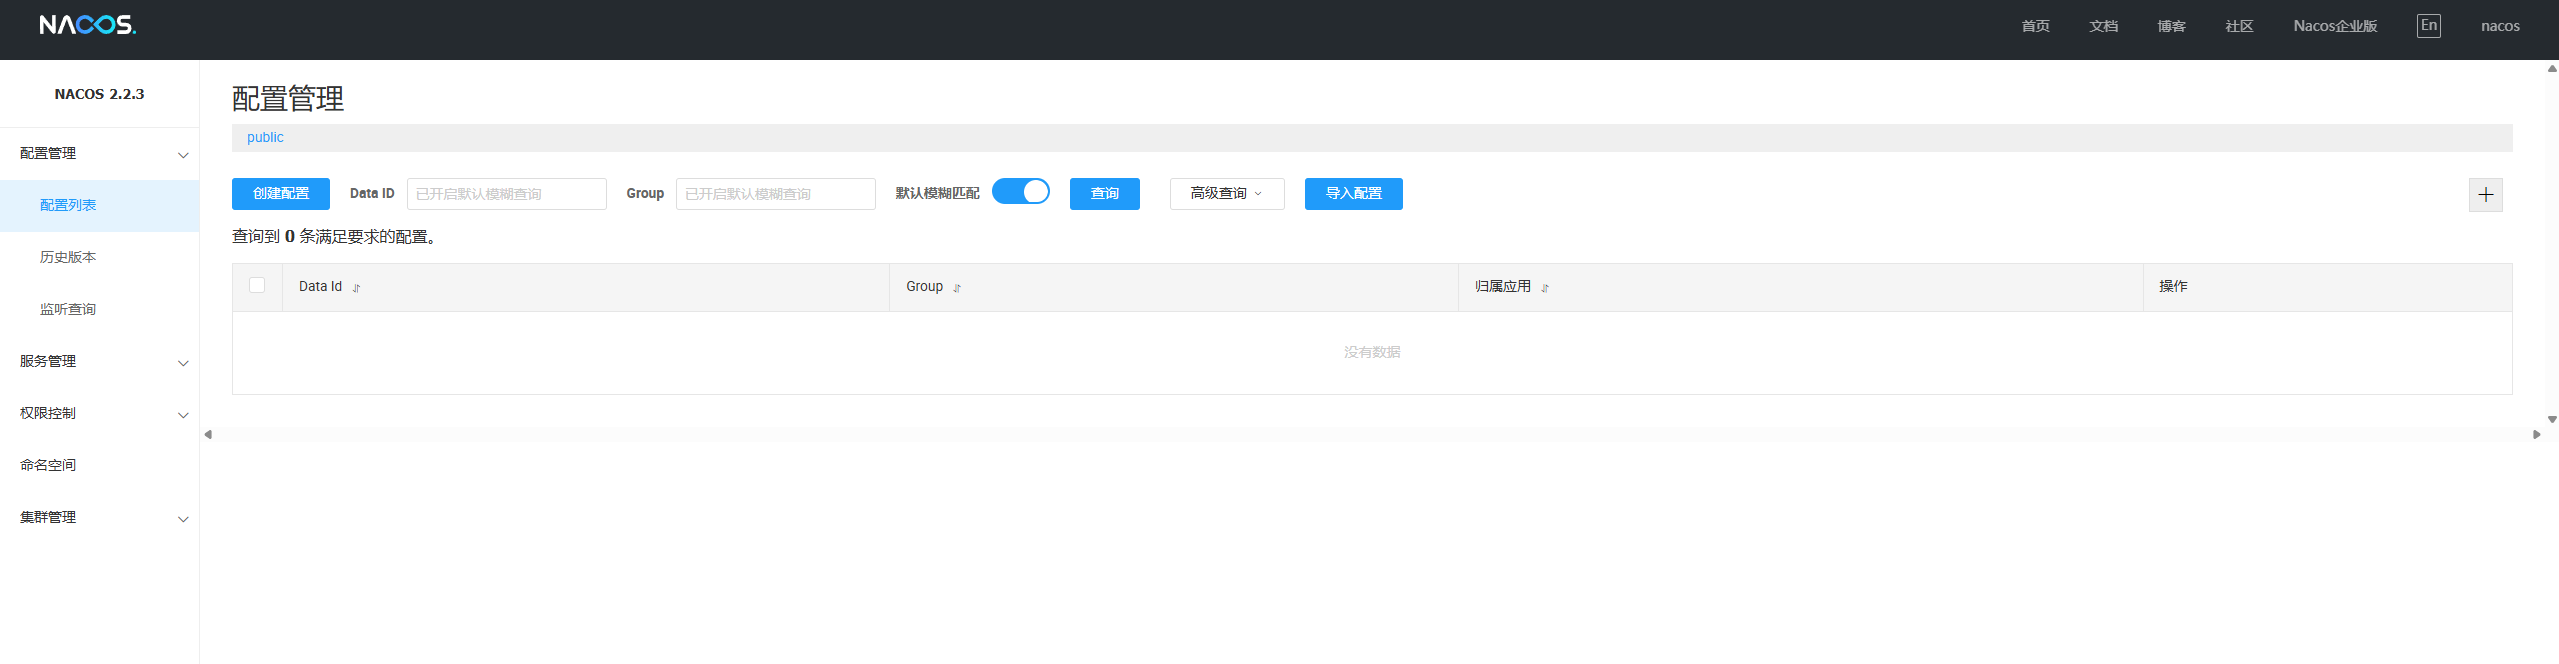
include: "*"在Nacos控制台中添加配置信息:
nacos-config-example.properties1
2
3
4spring.cloud.nacos.config.serveraddr=127.0.0.1:8848
spring.cloud.nacos.config.prefix=PREFIX
spring.cloud.nacos.config.group=GROUP
spring.cloud.nacos.config.namespace=NAMESPACE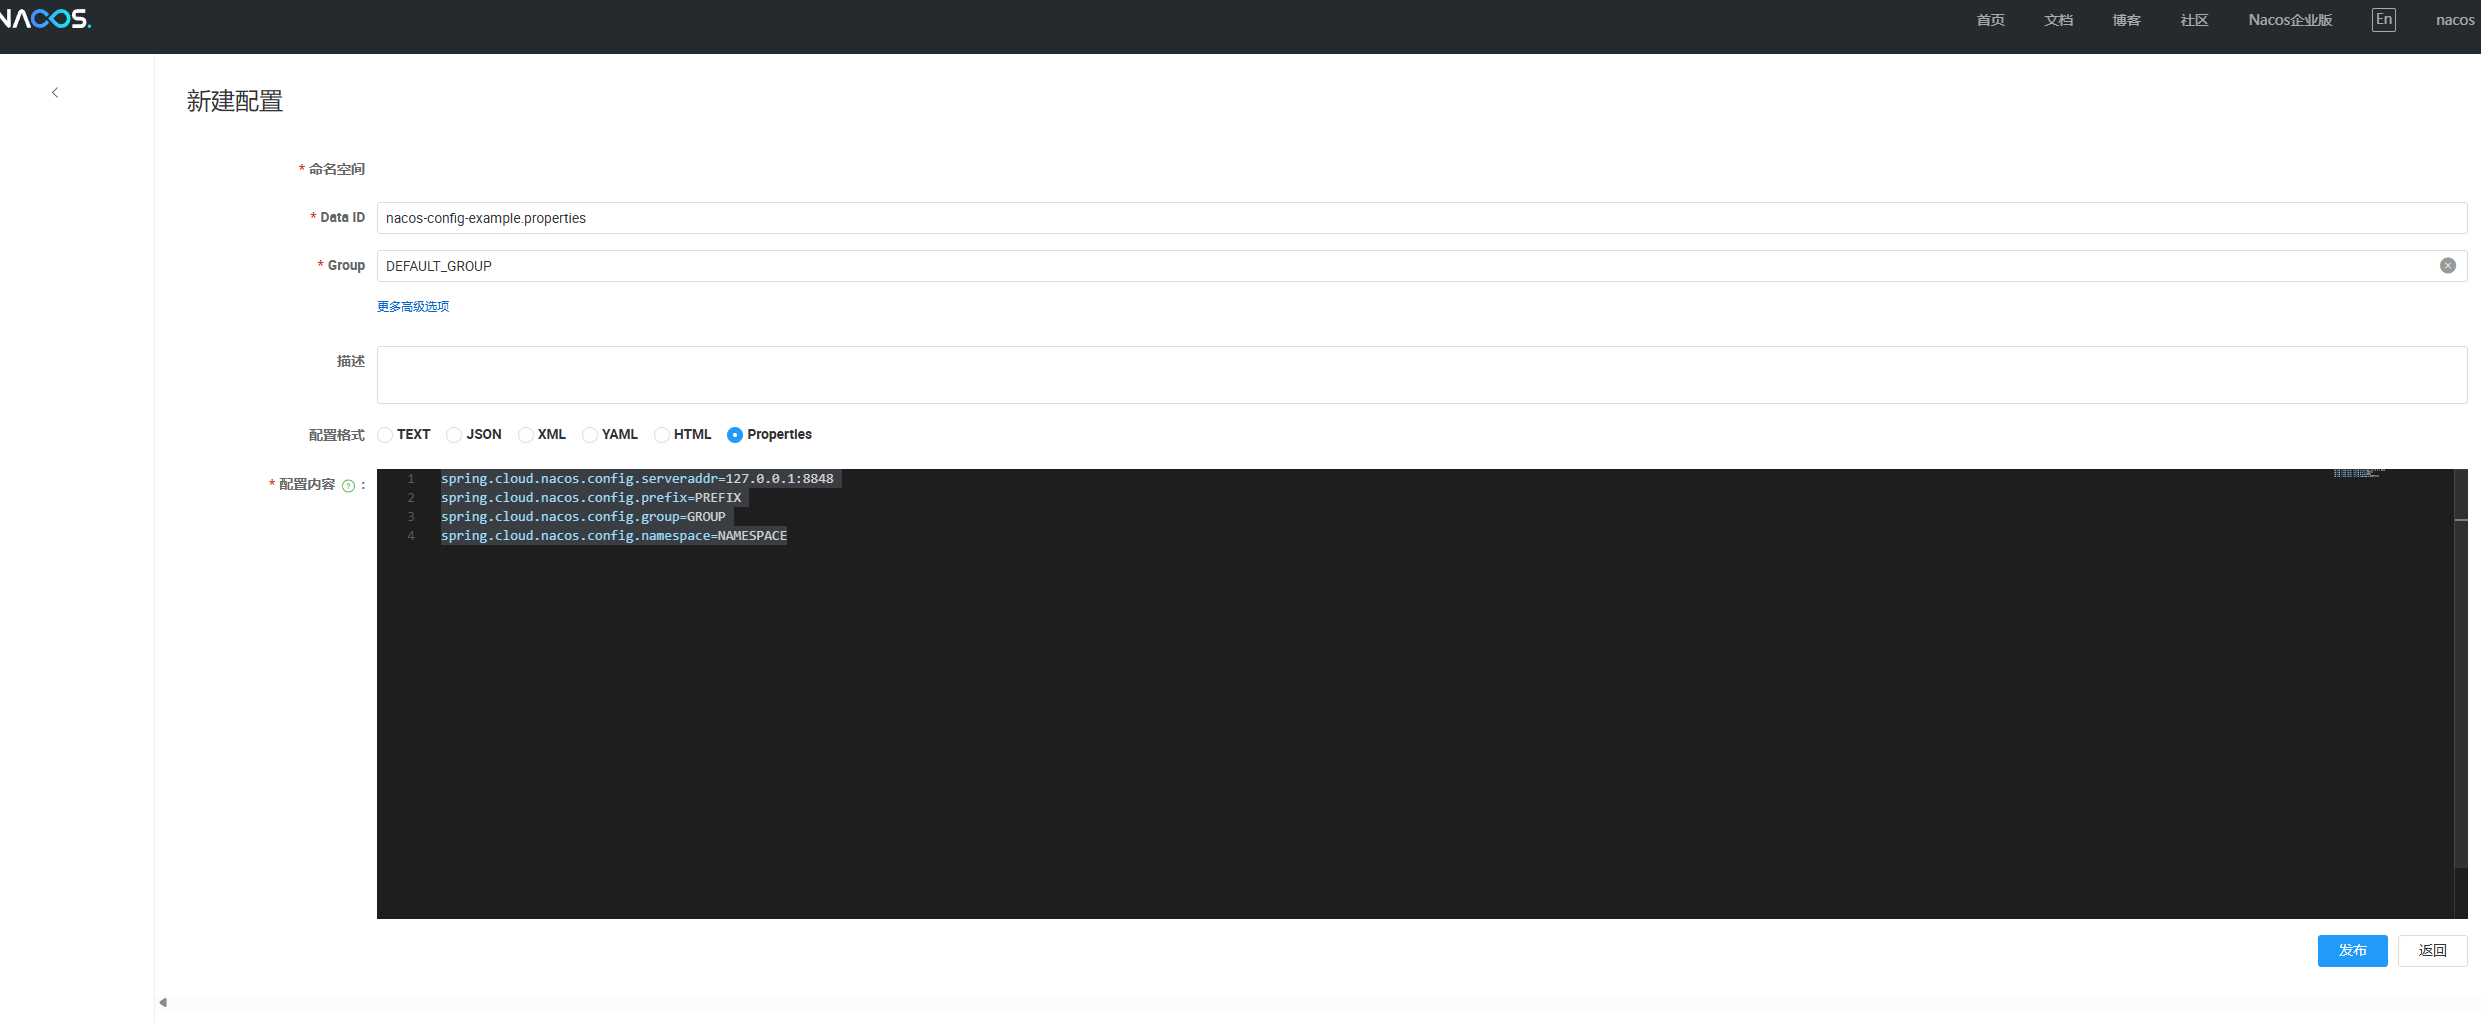
运行项目后可见,配置加载成功:

在Nacos控制台中修改nacos-config-example.properties的配置信息后,项目动态识别更新:

项目接入Nacos Discovery
新建一个NacosProvider子模块,在pom.xml文件中添加依赖:
1
2
3
4
5
6
7
8
9
10
11
12
13
14
15
16
17
18
19
20
21
22
23
24
25
26
27
28
29
30
31
32
33
34<?xml version="1.0" encoding="UTF-8"?>
<project xmlns="http://maven.apache.org/POM/4.0.0"
xmlns:xsi="http://www.w3.org/2001/XMLSchema-instance"
xsi:schemaLocation="http://maven.apache.org/POM/4.0.0 http://maven.apache.org/xsd/maven-4.0.0.xsd">
<modelVersion>4.0.0</modelVersion>
<parent>
<groupId>com.example</groupId>
<artifactId>SpringCloudAlibabaDemo</artifactId>
<version>0.0.1-SNAPSHOT</version>
</parent>
<artifactId>NacosProvider</artifactId>
<dependencies>
<dependency>
<groupId>org.springframework.boot</groupId>
<artifactId>spring-boot-starter-web</artifactId>
</dependency>
<dependency>
<groupId>com.alibaba.cloud</groupId>
<artifactId>spring-cloud-starter-alibaba-nacos-discovery</artifactId>
</dependency>
</dependencies>
<build>
<plugins>
<plugin>
<groupId>org.springframework.boot</groupId>
<artifactId>spring-boot-maven-plugin</artifactId>
</plugin>
</plugins>
</build>
</project>在NacosProvider模块的application.yml文件中添加配置:
1
2
3
4
5
6
7
8
9
10
11spring:
application:
name: NacosProvider
cloud:
nacos:
discovery:
server-addr: 127.0.0.1:8848
username: nacos
password: nacos
server:
port: 18085在NacosProvider模块的启动类上添加注解
@EnableDiscoveryClient,开启Nacos服务发现:1
2
3
4
5
6
7
8
9
10
11
12
13package com.example;
import org.springframework.boot.SpringApplication;
import org.springframework.boot.autoconfigure.SpringBootApplication;
import org.springframework.cloud.client.discovery.EnableDiscoveryClient;
@SpringBootApplication
@EnableDiscoveryClient
public class NacosProviderApplication {
public static void main(String[] args) {
SpringApplication.run(NacosProviderApplication.class, args);
}
}添加这个注解后,这个项目就成为了服务的提供者。
在NacosProvider模块提供一个接口,便于后面消费者调用:
1
2
3
4
5
6
7
8
9
10
11
12
13
14package com.example.controller;
import org.springframework.web.bind.annotation.GetMapping;
import org.springframework.web.bind.annotation.RequestMapping;
import org.springframework.web.bind.annotation.RestController;
@RestController
@RequestMapping("/provider")
public class Provider {
@GetMapping("/hello")
public String hello() {
return "hello nacos";
}
}启动NacosProvider项目后,可以在Nacos控制台看见服务已被注册:

我们新建一个NacosConsumer子模块,在pom.xml中添加依赖:
1
2
3
4
5
6
7
8
9
10
11
12
13
14
15
16
17
18
19
20
21
22
23
24
25
26
27
28
29
30
31
32
33
34
35
36
37
38
39
40
41
42<?xml version="1.0" encoding="UTF-8"?>
<project xmlns="http://maven.apache.org/POM/4.0.0"
xmlns:xsi="http://www.w3.org/2001/XMLSchema-instance"
xsi:schemaLocation="http://maven.apache.org/POM/4.0.0 http://maven.apache.org/xsd/maven-4.0.0.xsd">
<modelVersion>4.0.0</modelVersion>
<parent>
<groupId>com.example</groupId>
<artifactId>SpringCloudAlibabaDemo</artifactId>
<version>0.0.1-SNAPSHOT</version>
</parent>
<artifactId>NacosConsumer</artifactId>
<dependencies>
<dependency>
<groupId>org.springframework.boot</groupId>
<artifactId>spring-boot-starter-web</artifactId>
</dependency>
<dependency>
<groupId>com.alibaba.cloud</groupId>
<artifactId>spring-cloud-starter-alibaba-nacos-discovery</artifactId>
</dependency>
<dependency>
<groupId>org.springframework.cloud</groupId>
<artifactId>spring-cloud-loadbalancer</artifactId>
</dependency>
</dependencies>
<dependency>
<groupId>org.springframework.cloud</groupId>
<artifactId>spring-cloud-starter-openfeign</artifactId>
</dependency>
<build>
<plugins>
<plugin>
<groupId>org.springframework.boot</groupId>
<artifactId>spring-boot-maven-plugin</artifactId>
</plugin>
</plugins>
</build>
</project>在application.yml文件中添加配置:
1
2
3
4
5
6
7
8
9
10
11
12
13
14spring:
application:
name: NacosConsumer
cloud:
nacos:
discovery:
server-addr: 127.0.0.1:8848
username: nacos
password: nacos
loadbalancer:
nacos:
enabled: true
server:
port: 18086在NacosConsumer模块的启动类上添加注解
@EnableDiscoveryClient,开启Nacos服务发现,添加注解
@EnableFeignClients开启Feign:1
2
3
4
5
6
7
8
9
10
11
12
13
14
15package example;
import org.springframework.boot.SpringApplication;
import org.springframework.boot.autoconfigure.SpringBootApplication;
import org.springframework.cloud.client.discovery.EnableDiscoveryClient;
import org.springframework.cloud.openfeign.EnableFeignClients;
@SpringBootApplication
@EnableDiscoveryClient
@EnableFeignClients
public class NacosConsumerApplication {
public static void main(String[] args) {
SpringApplication.run(NacosConsumerApplication.class, args);
}
}在NacosConsumer模块配置一个 FeignClient:
1
2
3
4
5
6
7
8
9
10
11
12package example.api;
import org.springframework.cloud.openfeign.FeignClient;
import org.springframework.web.bind.annotation.GetMapping;
// value 对应 Nacos 中的服务名
@FeignClient(value = "NacosProvider", path = "/provider")
public interface UserClient {
@GetMapping("/hello")
String hello();
}就可以正常使用这个接口了:
1
2
3
4
5
6
7
8
9
10
11
12
13
14
15
16
17
18
19
20package example.controller;
import example.api.UserClient;
import jakarta.annotation.Resource;
import org.springframework.web.bind.annotation.GetMapping;
import org.springframework.web.bind.annotation.RequestMapping;
import org.springframework.web.bind.annotation.RestController;
@RestController
@RequestMapping("/consumer")
public class Consumer {
@Resource
private UserClient userClient;
@GetMapping("/hello")
public String hello() {
return userClient.hello();
}
}启动NacosProvider和NacosConsumer,在浏览器访问http://127.0.0.1:18086/consumer/hello,正确返回了`hello nacos`字符串。
分布式事务:Seata
分布式事务是什么?
我们知道,事务具有四大特性:原子性(Atomicity)、一致性(Consistency)、隔离性(Isolation)、持久性(Durability)。系统需要通过对原子性、隔离性以及持久性的权衡,来保障数据的一致性。
区别于单体项目,分布式事务的难点在于,一个事务涉及的数据需要在多个模块、多台服务器上进行操作。数据传输的不确定性,造成了分布式事务的复杂性。
Seata应运而生。
Seata实战
启动Seata
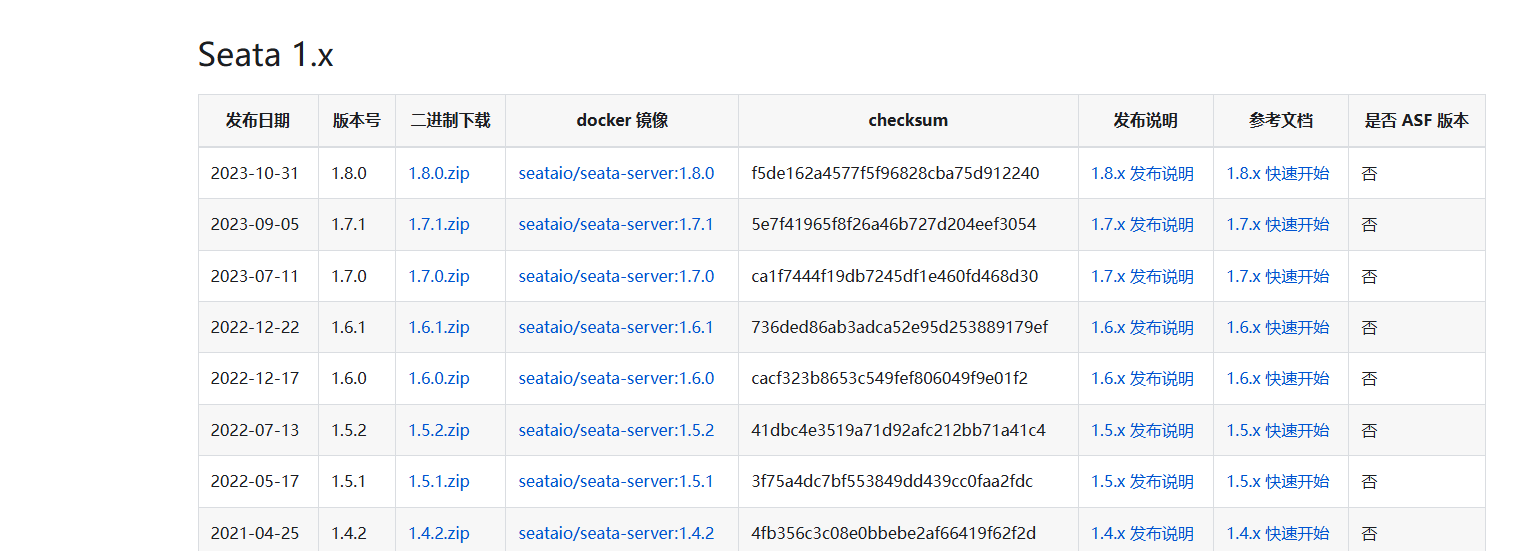
在Seata官网下载Spring Cloud Alibaba对应版本的Seata 1.7.0二进制压缩包:
修改Seata配置文件。
seata/conf/application.example.yml是参考模版,需要在seata/conf/application.yml提供自己的配置信息。我这里已经改好了,可以参考注解修改:1
2
3
4
5
6
7
8
9
10
11
12
13
14
15
16
17
18
19
20
21
22
23
24
25
26
27
28
29
30
31
32
33
34
35
36
37
38
39
40
41
42
43
44
45
46
47
48
49
50
51
52
53
54
55
56
57
58
59
60
61
62
63
64
65
66
67
68
69
70
71
72
73
74
75
76
77
78
79
80
81
82
83
84
85
86
87
88
89
90
91
92
93
94
95server:
port: 7091 # 默认端口
spring:
application:
name: seata-server # 默认服务名称
logging:
config: classpath:logback-spring.xml # 日志配置
file:
path: ${user.home}/logs/seata
extend:
logstash-appender:
destination: 127.0.0.1:4560
kafka-appender:
bootstrap-servers: 127.0.0.1:9092
topic: logback_to_logstash
console: # 控制台的用户名密码
user:
username: seata
password: seata
seata:
config:
# support: nacos 、 consul 、 apollo 、 zk 、 etcd3
type: nacos # 指定nacos作为配置中心
nacos:
server-addr: 127.0.0.1:8848 # nacos的地址
namespace:
group: SEATA_GROUP
username: nacos # nacos控制台的用户名密码
password: nacos
##if use MSE Nacos with auth, mutex with username/password attribute
#access-key: ""
#secret-key: ""
data-id: seataServer.properties
registry:
# support: nacos 、 eureka 、 redis 、 zk 、 consul 、 etcd3 、 sofa
type: nacos # 指定nacos作为注册中心
preferred-networks: 30.240.*
nacos:
application: seata-server
server-addr: 127.0.0.1:8848
group: SEATA_GROUP
namespace:
cluster: default
username: nacos
password: nacos
##if use MSE Nacos with auth, mutex with username/password attribute
#access-key: ""
#secret-key: ""
server:
service-port: 8091 #If not configured, the default is '${server.port} + 1000' seata服务的配置 我这边都用的模版的默认配置
max-commit-retry-timeout: -1
max-rollback-retry-timeout: -1
rollback-retry-timeout-unlock-enable: false
enable-check-auth: true
enable-parallel-request-handle: true
retry-dead-threshold: 130000
xaer-nota-retry-timeout: 60000
vgroup-mapping:
fsp_tx_group: default
recovery:
handle-all-session-period: 1000
undo:
log-save-days: 7
log-delete-period: 86400000
session:
branch-async-queue-size: 5000 #branch async remove queue size
enable-branch-async-remove: false #enable to asynchronous remove branchSession
store:
# support: file 、 db 、 redis seata数据的保存方式
mode: db # 这边后续考虑高可用 选择使用数据库保存 默认是file文件
db:
datasource: druid
db-type: mysql
driver-class-name: com.mysql.cj.jdbc.Driver
url: jdbc:mysql://127.0.0.1:3308/seata?rewriteBatchedStatements=true # 自己的MySQL地址,及用户名密码
user: root
password: 2469
min-conn: 5
max-conn: 100
global-table: global_table
branch-table: branch_table
lock-table: lock_table
distributed-lock-table: distributed_lock
query-limit: 100
max-wait: 5000
security:
secretKey: SeataSecretKey0c382ef121d778043159209298fd40bf3850a017
tokenValidityInMilliseconds: 1800000
ignore:
urls: /,/**/*.css,/**/*.js,/**/*.html,/**/*.map,/**/*.svg,/**/*.png,/**/*.ico,/console-fe/public/**,/api/v1/auth/login在
seata/lib/jdbc下,会有多个mySQL驱动版本,留下自己的版本,删除其它: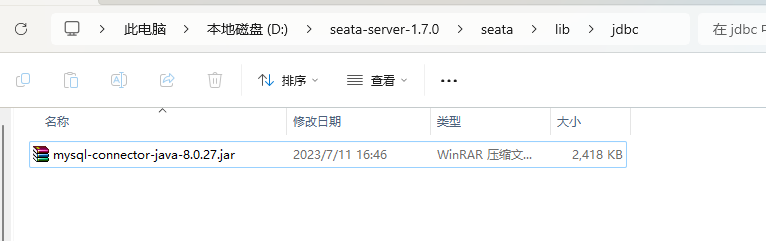
在MySQL中创建数据库
seata,执行seata/script/server/db/mysql.sql文件,创建4张表:global_table、branch_table、lock_table、distributed_lock。执行下面的sql,创建 undo_log 表:
1
2
3
4
5
6
7
8
9
10
11
12
13CREATE TABLE `undo_log` (
`id` bigint(20) NOT NULL AUTO_INCREMENT,
`branch_id` bigint(20) NOT NULL,
`xid` varchar(100) NOT NULL,
`context` varchar(128) NOT NULL,
`rollback_info` longblob NOT NULL,
`log_status` int(11) NOT NULL,
`log_created` datetime NOT NULL,
`log_modified` datetime NOT NULL,
`ext` varchar(100) DEFAULT NULL,
PRIMARY KEY (`id`),
UNIQUE KEY `ux_undo_log` (`xid`,`branch_id`)
) ENGINE=InnoDB AUTO_INCREMENT=1 DEFAULT CHARSET=utf8;在nacos/bin目录下通过cmd命令行运行
startup.cmd -m standalone启动Nacos单机模式。然后运行
seata/bin/seata-server.bat文件,启动Seata Server: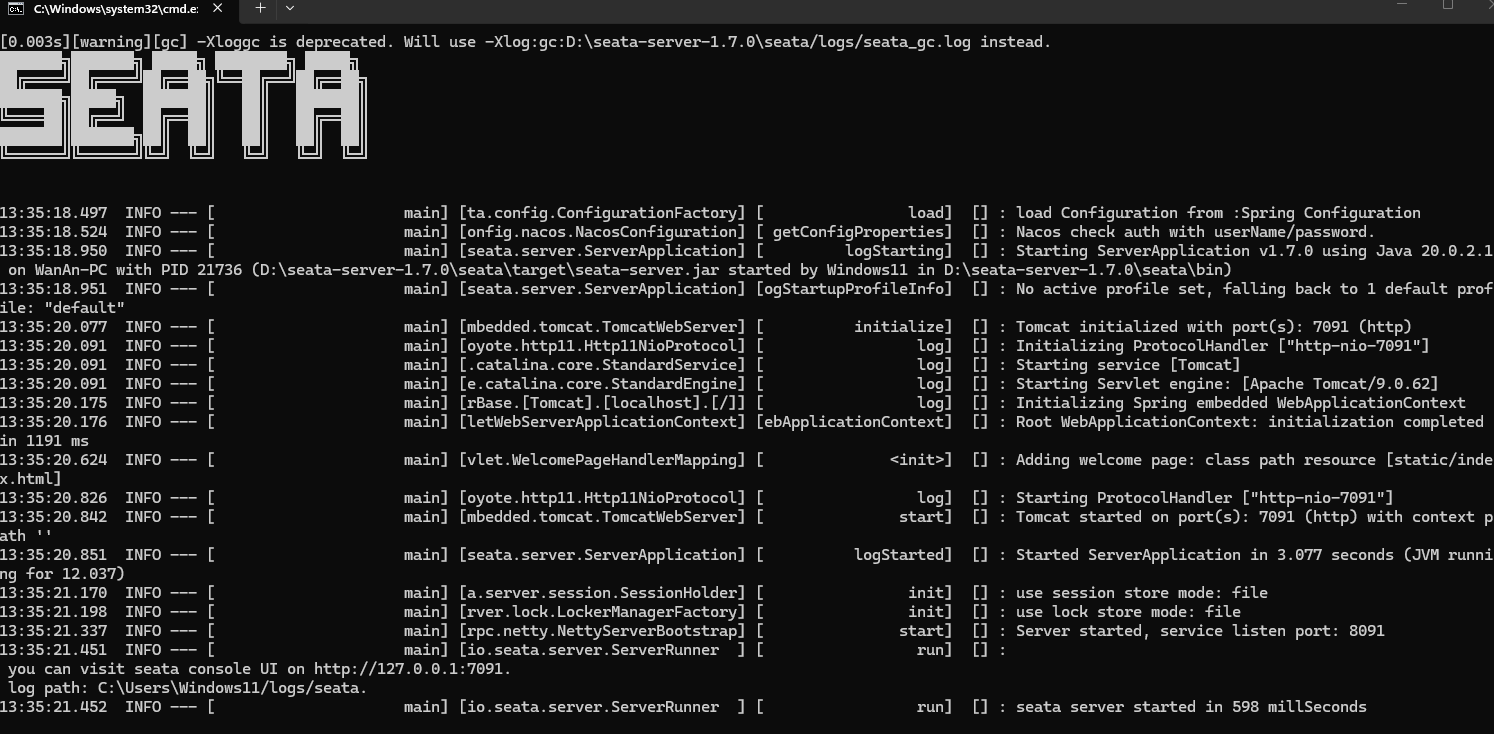
成功访问http://127.0.0.1:7091/,账号/密码:seata/seata

访问Nacos控制台可以看见seata-server已成功注册:

创建示例项目
在
seata数据库中创建示例项目需要的表:1
2
3
4
5
6
7
8
9
10
11
12
13
14
15
16
17
18
19
20
21
22
23
24
25
26
27
28
29-- -------------- Create the database tables needed by the business in the example ----------------
DROP TABLE IF EXISTS `storage_tbl`;
CREATE TABLE `storage_tbl` (
`id` int(11) NOT NULL AUTO_INCREMENT,
`commodity_code` varchar(255) DEFAULT NULL,
`count` int(11) DEFAULT 0,
PRIMARY KEY (`id`),
UNIQUE KEY (`commodity_code`)
) ENGINE=InnoDB DEFAULT CHARSET=utf8;
DROP TABLE IF EXISTS `order_tbl`;
CREATE TABLE `order_tbl` (
`id` int(11) NOT NULL AUTO_INCREMENT,
`user_id` varchar(255) DEFAULT NULL,
`commodity_code` varchar(255) DEFAULT NULL,
`count` int(11) DEFAULT 0,
`money` int(11) DEFAULT 0,
PRIMARY KEY (`id`)
) ENGINE=InnoDB DEFAULT CHARSET=utf8;
DROP TABLE IF EXISTS `account_tbl`;
CREATE TABLE `account_tbl` (
`id` int(11) NOT NULL AUTO_INCREMENT,
`user_id` varchar(255) DEFAULT NULL,
`money` int(11) DEFAULT 0,
PRIMARY KEY (`id`)
) ENGINE=InnoDB DEFAULT CHARSET=utf8;在父项目
SpringCloudAlibabaDemo下新建子模块SeataStorage在SeataStorage中引入依赖:
1
2
3
4
5
6
7
8
9
10
11
12
13
14
15
16
17
18
19
20
21
22
23
24
25
26
27
28
29
30
31
32
33
34
35
36
37
38
39
40
41
42
43
44
45
46
47
48
49
50
51
52
53
54
55
56
57
58
59
60
61
<?xml version="1.0" encoding="UTF-8"?>
<project xmlns="http://maven.apache.org/POM/4.0.0"
xmlns:xsi="http://www.w3.org/2001/XMLSchema-instance"
xsi:schemaLocation="http://maven.apache.org/POM/4.0.0 http://maven.apache.org/xsd/maven-4.0.0.xsd">
<modelVersion>4.0.0</modelVersion>
<parent>
<groupId>com.example</groupId>
<artifactId>SpringCloudAlibabaDemo</artifactId>
<version>0.0.1-SNAPSHOT</version>
</parent>
<artifactId>SeataStorage</artifactId>
<dependencies>
<dependency>
<groupId>com.alibaba.cloud</groupId>
<artifactId>spring-cloud-starter-alibaba-seata</artifactId>
<exclusions>
<exclusion>
<artifactId>dubbo-filter-seata</artifactId>
<groupId>org.apache.dubbo.extensions</groupId>
</exclusion>
</exclusions>
</dependency>
<dependency>
<groupId>com.alibaba.cloud</groupId>
<artifactId>spring-cloud-starter-alibaba-nacos-discovery</artifactId>
</dependency>
<dependency>
<groupId>org.springframework.boot</groupId>
<artifactId>spring-boot-starter-web</artifactId>
</dependency>
<dependency>
<groupId>org.springframework.boot</groupId>
<artifactId>spring-boot-starter-actuator</artifactId>
</dependency>
<dependency>
<groupId>org.springframework.boot</groupId>
<artifactId>spring-boot-starter-jdbc</artifactId>
</dependency>
<dependency>
<groupId>mysql</groupId>
<artifactId>mysql-connector-java</artifactId>
</dependency>
<dependency>
<groupId>log4j</groupId>
<artifactId>log4j</artifactId>
<version>1.2.17</version>
</dependency>
</dependencies>
<build>
<plugins>
<plugin>
<groupId>org.springframework.boot</groupId>
<artifactId>spring-boot-maven-plugin</artifactId>
</plugin>
</plugins>
</build>
</project>添加
application.yml配置:1
2
3
4
5
6
7
8
9
10
11
12
13
14
15
16
17
18
19
20
21
22
23
24
25
26
27
28
29
30
31
32
33
34
35
36
37
38
39
40
41
42
43
44
45
46
47
48
49
50base:
config:
mdb:
hostname: 127.0.0.1 #your mysql server ip address
dbname: seata #your database name for test
port: 3306 #your mysql server listening port
username: 'root' #your mysql server username
password: '2469' #your mysql server password
server:
port: 18092
spring:
cloud:
nacos:
discovery:
server-addr: 127.0.0.1:8848
username: 'nacos'
password: 'nacos'
application:
name: storage-service
main:
allow-bean-definition-overriding: true
datasource:
name: storageDataSource
driver-class-name: com.mysql.cj.jdbc.Driver
url: jdbc:mysql://${base.config.mdb.hostname}:${base.config.mdb.port}/${base.config.mdb.dbname}?useSSL=false&serverTimezone=UTC
username: ${base.config.mdb.username}
password: ${base.config.mdb.password}
seata:
enabled: true
application-id: ${spring.application.name}
tx-service-group: ${spring.application.name}-tx-group
config:
type: nacos
nacos:
serverAddr: 127.0.0.1:8848
dataId: "seata.properties"
username: 'nacos'
password: 'nacos'
group: SEATA_GROUP
registry:
type: nacos
nacos:
application: seata-server
server-addr: 127.0.0.1:8848
username: 'nacos'
password: 'nacos'
group: SEATA_GROUP在
example/config/DatabaseConfiguration.java中编写jdbc配置:1
2
3
4
5
6
7
8
9
10
11
12
13
14
15
16
17
18
19
20
21
22
23
24
25package com.example.config;
import org.springframework.context.annotation.Bean;
import org.springframework.context.annotation.Configuration;
import org.springframework.jdbc.core.JdbcTemplate;
import javax.sql.DataSource;
@Configuration
public class DatabaseConfiguration {
@Bean
public JdbcTemplate jdbcTemplate(DataSource dataSource) {
JdbcTemplate jdbcTemplate = new JdbcTemplate(dataSource);
jdbcTemplate.update("delete from storage_tbl where commodity_code = 'C00321'");
jdbcTemplate.update(
"insert into storage_tbl(commodity_code, count) values ('C00321', 100)");
return jdbcTemplate;
}
}添加移除商品库存的接口
example/controller/StorageController.java:1
2
3
4
5
6
7
8
9
10
11
12
13
14
15
16
17
18
19
20
21
22
23
24
25
26
27
28
29
30
31
32
33
34
35
36
37
38
39
40package com.example.controller;
import io.seata.core.context.RootContext;
import org.slf4j.Logger;
import org.slf4j.LoggerFactory;
import org.springframework.jdbc.core.JdbcTemplate;
import org.springframework.web.bind.annotation.GetMapping;
import org.springframework.web.bind.annotation.PathVariable;
import org.springframework.web.bind.annotation.RestController;
@RestController
public class StorageController {
private static final Logger LOGGER = LoggerFactory.getLogger(StorageController.class);
private static final String SUCCESS = "SUCCESS";
private static final String FAIL = "FAIL";
private final JdbcTemplate jdbcTemplate;
public StorageController(JdbcTemplate jdbcTemplate) {
this.jdbcTemplate = jdbcTemplate;
}
@GetMapping(value = "/storage/{commodityCode}/{count}", produces = "application/json")
public String echo(@PathVariable String commodityCode, @PathVariable int count) {
LOGGER.info("Storage Service Begin ... xid: " + RootContext.getXID());
int result = jdbcTemplate.update(
"update storage_tbl set count = count - ? where commodity_code = ?",
count, commodityCode);
LOGGER.info("Storage Service End ... ");
if (result == 1) {
return SUCCESS;
}
return FAIL;
}
}在父项目
SpringCloudAlibabaDemo下新建子模块SeataOrder在子模块SeataOrder中添加依赖:
1
2
3
4
5
6
7
8
9
10
11
12
13
14
15
16
17
18
19
20
21
22
23
24
25
26
27
28
29
30
31
32
33
34
35
36
37
38
39
40
41
42
43
44
45
46
47
48
49
50
51
52
53
54
55
56
57
58
59
60
61
62<?xml version="1.0" encoding="UTF-8"?>
<project xmlns="http://maven.apache.org/POM/4.0.0"
xmlns:xsi="http://www.w3.org/2001/XMLSchema-instance"
xsi:schemaLocation="http://maven.apache.org/POM/4.0.0 http://maven.apache.org/xsd/maven-4.0.0.xsd">
<modelVersion>4.0.0</modelVersion>
<parent>
<groupId>com.example</groupId>
<artifactId>SpringCloudAlibabaDemo</artifactId>
<version>0.0.1-SNAPSHOT</version>
</parent>
<artifactId>SeataOrder</artifactId>
<dependencies>
<dependency>
<groupId>com.alibaba.cloud</groupId>
<artifactId>spring-cloud-starter-alibaba-nacos-discovery</artifactId>
</dependency>
<dependency>
<groupId>com.alibaba.cloud</groupId>
<artifactId>spring-cloud-starter-alibaba-seata</artifactId>
<exclusions>
<exclusion>
<artifactId>dubbo-filter-seata</artifactId>
<groupId>org.apache.dubbo.extensions</groupId>
</exclusion>
</exclusions>
</dependency>
<dependency>
<groupId>org.springframework.boot</groupId>
<artifactId>spring-boot-starter-web</artifactId>
</dependency>
<dependency>
<groupId>org.springframework.boot</groupId>
<artifactId>spring-boot-starter-actuator</artifactId>
</dependency>
<dependency>
<groupId>org.springframework.boot</groupId>
<artifactId>spring-boot-starter-jdbc</artifactId>
</dependency>
<dependency>
<groupId>mysql</groupId>
<artifactId>mysql-connector-java</artifactId>
</dependency>
<dependency>
<groupId>log4j</groupId>
<artifactId>log4j</artifactId>
<version>1.2.17</version>
</dependency>
</dependencies>
<build>
<plugins>
<plugin>
<groupId>org.springframework.boot</groupId>
<artifactId>spring-boot-maven-plugin</artifactId>
</plugin>
</plugins>
</build>
</project>在
resources/application.yml中添加配置:1
2
3
4
5
6
7
8
9
10
11
12
13
14
15
16
17
18
19
20
21
22
23
24
25
26
27
28
29
30
31
32
33
34
35
36
37
38
39
40
41
42
43
44
45
46
47
48
49base:
config:
mdb:
hostname: 127.0.0.1 #your mysql server ip address
dbname: seata #your database name for test
port: 3306 #your mysql server listening port
username: 'root' #your mysql server username
password: '2469' #your mysql server password
server:
port: 18093
spring:
cloud:
nacos:
discovery:
server-addr: 127.0.0.1:8848
username: 'nacos'
password: 'nacos'
application:
name: order-service
main:
allow-bean-definition-overriding: true
datasource:
name: storageDataSource
driver-class-name: com.mysql.cj.jdbc.Driver
url: jdbc:mysql://${base.config.mdb.hostname}:${base.config.mdb.port}/${base.config.mdb.dbname}?useSSL=false&serverTimezone=UTC
username: ${base.config.mdb.username}
password: ${base.config.mdb.password}
seata:
enabled: true
application-id: ${spring.application.name}
tx-service-group: ${spring.application.name}-tx-group
config:
type: nacos
nacos:
dataId: "seata.properties"
username: 'nacos'
password: 'nacos'
server-addr: 127.0.0.1:8848
group: SEATA_GROUP
registry:
type: nacos
nacos:
application: seata-server
server-addr: 127.0.0.1:8848
username: 'nacos'
password: 'nacos'
group: SEATA_GROUP在
example/config/DatabaseConfiguration.java中编写jdbc配置:1
2
3
4
5
6
7
8
9
10
11
12
13
14
15
16
17
18
19
20
21package com.example.config;
import org.springframework.context.annotation.Bean;
import org.springframework.context.annotation.Configuration;
import org.springframework.jdbc.core.JdbcTemplate;
import javax.sql.DataSource;
@Configuration
public class DatabaseConfiguration {
@Bean
public JdbcTemplate jdbcTemplate(DataSource dataSource) {
JdbcTemplate jdbcTemplate = new JdbcTemplate(dataSource);
jdbcTemplate.execute("TRUNCATE TABLE order_tbl");
return jdbcTemplate;
}
}在
example/Order.java中编写订单实体类:1
2
3
4
5
6
7
8
9
10
11
12
13
14
15
16
17
18
19
20
21
22
23
24
25
26
27
28
29
30
31
32
33
34
35
36
37
38package com.example;
import java.io.Serializable;
public class Order implements Serializable {
/**
* id.
*/
public long id;
/**
* user id.
*/
public String userId;
/**
* commodity code.
*/
public String commodityCode;
/**
* count.
*/
public int count;
/**
* money.
*/
public int money;
@Override
public String toString() {
return "Order{" + "id=" + id + ", userId='" + userId + '\'' + ", commodityCode='"
+ commodityCode + '\'' + ", count=" + count + ", money=" + money + '}';
}
}在
example/SeataOrderApplication.java中提供RestTemplate的Bean:1
2
3
4
5
6
7
8
9
10
11
12
13
14
15
16
17
18
19
20package com.example;
import org.springframework.boot.SpringApplication;
import org.springframework.boot.autoconfigure.SpringBootApplication;
import org.springframework.context.annotation.Bean;
import org.springframework.web.client.RestTemplate;
@SpringBootApplication
public class SeataOrderApplication {
public static void main(String[] args) {
SpringApplication.run(SeataOrderApplication.class, args);
}
@Bean
public RestTemplate restTemplate() {
return new RestTemplate();
}
}在
example/OrderController.java中添加创建订单的接口,并且调用账号模块提供的接口来扣除账号下的金额:1
2
3
4
5
6
7
8
9
10
11
12
13
14
15
16
17
18
19
20
21
22
23
24
25
26
27
28
29
30
31
32
33
34
35
36
37
38
39
40
41
42
43
44
45
46
47
48
49
50
51
52
53
54
55
56
57
58
59
60
61
62
63
64
65
66
67
68
69
70
71
72
73
74
75
76
77
78
79
80
81
82
83
84
85
86
87
88
89
90
91
92
93
94
95
96
97
98
99
100
101
102
103
104
105
106
107
108
109
110package com.example;
import io.seata.core.context.RootContext;
import org.slf4j.Logger;
import org.slf4j.LoggerFactory;
import org.springframework.http.HttpEntity;
import org.springframework.http.HttpHeaders;
import org.springframework.http.MediaType;
import org.springframework.http.ResponseEntity;
import org.springframework.jdbc.core.JdbcTemplate;
import org.springframework.jdbc.support.GeneratedKeyHolder;
import org.springframework.jdbc.support.KeyHolder;
import org.springframework.util.LinkedMultiValueMap;
import org.springframework.util.MultiValueMap;
import org.springframework.web.bind.annotation.PostMapping;
import org.springframework.web.bind.annotation.RestController;
import org.springframework.web.client.RestTemplate;
import java.sql.PreparedStatement;
import java.util.Random;
@RestController
public class OrderController {
private static final Logger LOGGER = LoggerFactory.getLogger(OrderController.class);
private static final String SUCCESS = "SUCCESS";
private static final String FAIL = "FAIL";
private static final String USER_ID = "U100001";
private static final String COMMODITY_CODE = "C00321";
private final JdbcTemplate jdbcTemplate;
private final RestTemplate restTemplate;
private Random random;
public OrderController(JdbcTemplate jdbcTemplate, RestTemplate restTemplate) {
this.jdbcTemplate = jdbcTemplate;
this.restTemplate = restTemplate;
this.random = new Random();
}
@PostMapping(value = "/order", produces = "application/json")
public String order(String userId, String commodityCode, int orderCount) {
LOGGER.info("Order Service Begin ... xid: " + RootContext.getXID());
int orderMoney = calculate(commodityCode, orderCount);
invokerAccountService(orderMoney);
final Order order = new Order();
order.userId = userId;
order.commodityCode = commodityCode;
order.count = orderCount;
order.money = orderMoney;
KeyHolder keyHolder = new GeneratedKeyHolder();
int result = jdbcTemplate.update(con -> {
PreparedStatement pst = con.prepareStatement(
"insert into order_tbl (user_id, commodity_code, count, money) values (?, ?, ?, ?)",
PreparedStatement.RETURN_GENERATED_KEYS);
pst.setObject(1, order.userId);
pst.setObject(2, order.commodityCode);
pst.setObject(3, order.count);
pst.setObject(4, order.money);
return pst;
}, keyHolder);
order.id = keyHolder.getKey().longValue();
// 50%概率抛出异常,模拟订单创建异常,测试事务回滚
if (random.nextBoolean()) {
throw new RuntimeException("this is a mock Exception");
}
LOGGER.info("Order Service End ... Created " + order);
if (result == 1) {
return SUCCESS;
}
return FAIL;
}
private int calculate(String commodityId, int orderCount) {
return 2 * orderCount;
}
private void invokerAccountService(int orderMoney) {
String url = "http://127.0.0.1:18094/account";
HttpHeaders headers = new HttpHeaders();
headers.setContentType(MediaType.APPLICATION_FORM_URLENCODED);
MultiValueMap<String, String> map = new LinkedMultiValueMap<String, String>();
map.add("userId", USER_ID);
map.add("money", orderMoney + "");
HttpEntity<MultiValueMap<String, String>> request = new HttpEntity<MultiValueMap<String, String>>(
map, headers);
ResponseEntity<String> response = restTemplate.postForEntity(url, request,
String.class);
}
}在父项目
SpringCloudAlibabaDemo下新建子模块SeataBusiness在子模块SeataBusiness中添加依赖:
1
2
3
4
5
6
7
8
9
10
11
12
13
14
15
16
17
18
19
20
21
22
23
24
25
26
27
28
29
30
31
32
33
34
35
36
37
38
39
40
41
42
43
44
45
46
47
48
49
50
51
52
53
54
55
56
57
58
59
60<?xml version="1.0" encoding="UTF-8"?>
<project xmlns="http://maven.apache.org/POM/4.0.0"
xmlns:xsi="http://www.w3.org/2001/XMLSchema-instance"
xsi:schemaLocation="http://maven.apache.org/POM/4.0.0 http://maven.apache.org/xsd/maven-4.0.0.xsd">
<modelVersion>4.0.0</modelVersion>
<parent>
<groupId>com.example</groupId>
<artifactId>SpringCloudAlibabaDemo</artifactId>
<version>0.0.1-SNAPSHOT</version>
</parent>
<artifactId>SeataBusiness</artifactId>
<dependencies>
<dependency>
<groupId>com.alibaba.cloud</groupId>
<artifactId>spring-cloud-starter-alibaba-seata</artifactId>
<exclusions>
<exclusion>
<artifactId>dubbo-filter-seata</artifactId>
<groupId>org.apache.dubbo.extensions</groupId>
</exclusion>
</exclusions>
</dependency>
<dependency>
<groupId>com.alibaba.cloud</groupId>
<artifactId>spring-cloud-starter-alibaba-nacos-discovery</artifactId>
</dependency>
<dependency>
<groupId>org.springframework.cloud</groupId>
<artifactId>spring-cloud-starter-openfeign</artifactId>
</dependency>
<dependency>
<groupId>org.springframework.cloud</groupId>
<artifactId>spring-cloud-starter-loadbalancer</artifactId>
</dependency>
<dependency>
<groupId>org.springframework.boot</groupId>
<artifactId>spring-boot-starter-web</artifactId>
</dependency>
<dependency>
<groupId>org.springframework.boot</groupId>
<artifactId>spring-boot-starter-actuator</artifactId>
</dependency>
<dependency>
<groupId>org.springframework</groupId>
<artifactId>spring-tx</artifactId>
</dependency>
</dependencies>
<build>
<plugins>
<plugin>
<groupId>org.springframework.boot</groupId>
<artifactId>spring-boot-maven-plugin</artifactId>
</plugin>
</plugins>
</build>
</project>在
resources/application.yml中添加配置:1
2
3
4
5
6
7
8
9
10
11
12
13
14
15
16
17
18
19
20
21
22
23
24
25
26
27
28
29
30
31
32
33
34
35
36
37
38
39
40
41
42
43
44
45
46
47
48server:
port: 18091
spring:
cloud:
nacos:
discovery:
server-addr: 127.0.0.1:8848
username: 'nacos'
password: 'nacos'
loadbalancer:
ribbon:
enabled:true
application:
name: business-service
seata:
enabled: true
application-id: ${spring.application.name}
tx-service-group: ${spring.application.name}-tx-group
config:
type: nacos
nacos:
dataId: "seata.properties"
username: 'nacos'
password: 'nacos'
server-addr: 127.0.0.1:8848
group: SEATA_GROUP
registry:
type: nacos
nacos:
application: seata-server
server-addr: 127.0.0.1:8848
username: 'nacos'
password: 'nacos'
group: SEATA_GROUP
feign:
client:
config:
default:
connectTimeout: 10000
readTimeout: 10000
logging:
level:
io:
seata: debug在
example/SeataBusinessApplication.java文件中引入其他模块的接口:1
2
3
4
5
6
7
8
9
10
11
12
13
14
15
16
17
18
19
20
21
22
23
24
25
26
27
28
29
30
31
32
33
34
35
36
37
38
39
40
41
42
43
44
45
46
47
48
49
50
51
52
53
54package com.example;
import org.springframework.boot.SpringApplication;
import org.springframework.boot.autoconfigure.SpringBootApplication;
import org.springframework.cloud.client.discovery.EnableDiscoveryClient;
import org.springframework.cloud.loadbalancer.annotation.LoadBalancerClient;
import org.springframework.cloud.loadbalancer.annotation.LoadBalancerClients;
import org.springframework.cloud.openfeign.EnableFeignClients;
import org.springframework.cloud.openfeign.FeignClient;
import org.springframework.context.annotation.Bean;
import org.springframework.web.bind.annotation.GetMapping;
import org.springframework.web.bind.annotation.PathVariable;
import org.springframework.web.bind.annotation.PostMapping;
import org.springframework.web.bind.annotation.RequestParam;
import org.springframework.web.client.RestTemplate;
@SpringBootApplication
@EnableFeignClients
@EnableDiscoveryClient(autoRegister = false)
@LoadBalancerClients({
@LoadBalancerClient("storage-service"),
@LoadBalancerClient("order-service")
})
public class SeataBusinessApplication {
public static void main(String[] args) {
SpringApplication.run(SeataBusinessApplication.class, args);
}
@Bean
public RestTemplate restTemplate() {
return new RestTemplate();
}
@FeignClient("storage-service")
public interface StorageService {
@GetMapping(path = "/storage/{commodityCode}/{count}")
String storage(@PathVariable("commodityCode") String commodityCode,
@PathVariable("count") int count);
}
@FeignClient("order-service")
public interface OrderService {
@PostMapping(path = "/order")
String order(@RequestParam("userId") String userId,
@RequestParam("commodityCode") String commodityCode,
@RequestParam("orderCount") int orderCount);
}
}在
example/Order.java中添加订单实体类:1
2
3
4
5
6
7
8
9
10
11
12
13
14
15
16
17
18
19
20
21
22
23
24
25
26
27
28
29
30
31
32
33
34
35
36
37
38package com.example;
import java.io.Serializable;
public class Order implements Serializable {
/**
* order id.
*/
public long id;
/**
* user id.
*/
public String userId;
/**
* commodity code.
*/
public String commodityCode;
/**
* count.
*/
public int count;
/**
* money.
*/
public int money;
@Override
public String toString() {
return "Order{" + "id=" + id + ", userId='" + userId + '\'' + ", commodityCode='"
+ commodityCode + '\'' + ", count=" + count + ", money=" + money + '}';
}
}在
example/OrderController.java中,rest方法用RestTemplate直接通过URL调用其它模块;feign方法结合Nacos服务发现,通过FeignClient调用其它模块。测试两种方式下的Seata全局事务:1
2
3
4
5
6
7
8
9
10
11
12
13
14
15
16
17
18
19
20
21
22
23
24
25
26
27
28
29
30
31
32
33
34
35
36
37
38
39
40
41
42
43
44
45
46
47
48
49
50
51
52
53
54
55
56
57
58
59
60
61
62
63
64
65
66
67
68
69
70
71
72
73
74
75
76
77
78
79
80
81
82
83
84
85
86
87
88
89
90
91
92
93
94
95
96
97
98
99
100
101
102
103
104package com.example;
import com.example.SeataBusinessApplication.OrderService;
import com.example.SeataBusinessApplication.StorageService;
import io.seata.spring.annotation.GlobalTransactional;
import org.slf4j.Logger;
import org.slf4j.LoggerFactory;
import org.springframework.http.HttpEntity;
import org.springframework.http.HttpHeaders;
import org.springframework.http.MediaType;
import org.springframework.http.ResponseEntity;
import org.springframework.util.LinkedMultiValueMap;
import org.springframework.util.MultiValueMap;
import org.springframework.web.bind.annotation.GetMapping;
import org.springframework.web.bind.annotation.RestController;
import org.springframework.web.client.RestTemplate;
@RestController
public class HomeController {
private static final Logger LOGGER = LoggerFactory.getLogger(HomeController.class);
private static final String SUCCESS = "SUCCESS";
private static final String FAIL = "FAIL";
private static final String USER_ID = "U100001";
private static final String COMMODITY_CODE = "C00321";
private static final int ORDER_COUNT = 2;
private final RestTemplate restTemplate;
private final OrderService orderService;
private final StorageService storageService;
public HomeController(RestTemplate restTemplate, OrderService orderService,
StorageService storageService) {
this.restTemplate = restTemplate;
this.orderService = orderService;
this.storageService = storageService;
}
@GlobalTransactional(timeoutMills = 300000, name = "spring-cloud-demo-tx")
@GetMapping(value = "/seata/rest", produces = "application/json")
public String rest() {
String result = restTemplate.getForObject(
"http://127.0.0.1:18092/storage/" + COMMODITY_CODE + "/" + ORDER_COUNT,
String.class);
if (!SUCCESS.equals(result)) {
throw new RuntimeException();
}
String url = "http://127.0.0.1:18093/order";
HttpHeaders headers = new HttpHeaders();
headers.setContentType(MediaType.APPLICATION_FORM_URLENCODED);
MultiValueMap<String, String> map = new LinkedMultiValueMap<String, String>();
map.add("userId", USER_ID);
map.add("commodityCode", COMMODITY_CODE);
map.add("orderCount", ORDER_COUNT + "");
HttpEntity<MultiValueMap<String, String>> request = new HttpEntity<MultiValueMap<String, String>>(
map, headers);
ResponseEntity<String> response;
try {
response = restTemplate.postForEntity(url, request, String.class);
} catch (Exception exx) {
throw new RuntimeException("mock error");
}
result = response.getBody();
if (!SUCCESS.equals(result)) {
throw new RuntimeException();
}
return SUCCESS;
}
@GlobalTransactional(timeoutMills = 300000, name = "spring-cloud-demo-tx")
@GetMapping(value = "/seata/feign", produces = "application/json")
public String feign() {
String result = storageService.storage(COMMODITY_CODE, ORDER_COUNT);
if (!SUCCESS.equals(result)) {
throw new RuntimeException();
}
result = orderService.order(USER_ID, COMMODITY_CODE, ORDER_COUNT);
if (!SUCCESS.equals(result)) {
throw new RuntimeException();
}
return SUCCESS;
}
}在父项目
SpringCloudAlibabaDemo下新建子模块SeataAccount在子模块SeataAccount中添加依赖:
1
2
3
4
5
6
7
8
9
10
11
12
13
14
15
16
17
18
19
20
21
22
23
24
25
26
27
28
29
30
31
32
33
34
35
36
37
38
39
40
41
42
43
44
45
46
47
48
49
50
51
52
53
54
55
56
57
58
59
60
61<?xml version="1.0" encoding="UTF-8"?>
<project xmlns="http://maven.apache.org/POM/4.0.0"
xmlns:xsi="http://www.w3.org/2001/XMLSchema-instance"
xsi:schemaLocation="http://maven.apache.org/POM/4.0.0 http://maven.apache.org/xsd/maven-4.0.0.xsd">
<modelVersion>4.0.0</modelVersion>
<parent>
<groupId>com.example</groupId>
<artifactId>SpringCloudAlibabaDemo</artifactId>
<version>0.0.1-SNAPSHOT</version>
</parent>
<artifactId>SeataAccount</artifactId>
<dependencies>
<dependency>
<groupId>com.alibaba.cloud</groupId>
<artifactId>spring-cloud-starter-alibaba-seata</artifactId>
<exclusions>
<exclusion>
<artifactId>dubbo-filter-seata</artifactId>
<groupId>org.apache.dubbo.extensions</groupId>
</exclusion>
</exclusions>
</dependency>
<dependency>
<groupId>com.alibaba.cloud</groupId>
<artifactId>spring-cloud-starter-alibaba-nacos-discovery</artifactId>
</dependency>
<dependency>
<groupId>org.springframework.boot</groupId>
<artifactId>spring-boot-starter-web</artifactId>
</dependency>
<dependency>
<groupId>org.springframework.boot</groupId>
<artifactId>spring-boot-starter-actuator</artifactId>
</dependency>
<dependency>
<groupId>org.springframework.boot</groupId>
<artifactId>spring-boot-starter-jdbc</artifactId>
</dependency>
<dependency>
<groupId>mysql</groupId>
<artifactId>mysql-connector-java</artifactId>
</dependency>
<dependency>
<groupId>log4j</groupId>
<artifactId>log4j</artifactId>
<version>1.2.17</version>
</dependency>
</dependencies>
<build>
<plugins>
<plugin>
<groupId>org.springframework.boot</groupId>
<artifactId>spring-boot-maven-plugin</artifactId>
</plugin>
</plugins>
</build>
</project>在
resources/application.yml中添加配置:1
2
3
4
5
6
7
8
9
10
11
12
13
14
15
16
17
18
19
20
21
22
23
24
25
26
27
28
29
30
31
32
33
34
35
36
37
38
39
40
41
42
43
44
45
46
47
48
49
50
51
52base:
config:
mdb:
hostname: 127.0.0.1 #your mysql server ip address
dbname: seata #your database name for test
port: 3306 #your mysql server listening port
username: 'root' #your mysql server username
password: '2469' #your mysql server password
server:
port: 18094
spring:
cloud:
nacos:
discovery:
server-addr: 127.0.0.1:8848
username: 'nacos'
password: 'nacos'
application:
name: account-service
main:
allow-bean-definition-overriding: true
datasource:
name: storageDataSource
driver-class-name: com.mysql.cj.jdbc.Driver
url: jdbc:mysql://${base.config.mdb.hostname}:${base.config.mdb.port}/${base.config.mdb.dbname}?useSSL=false&serverTimezone=UTC
username: ${base.config.mdb.username}
password: ${base.config.mdb.password}
seata:
enabled: true
application-id: ${spring.application.name}
tx-service-group: ${spring.application.name}-tx-group
config:
type: nacos
nacos:
serverAddr: 127.0.0.1:8848
dataId: "seata.properties"
username: 'nacos'
password: 'nacos'
group: SEATA_GROUP
registry:
type: nacos
nacos:
application: seata-server
server-addr: 127.0.0.1:8848
username: 'nacos'
password: 'nacos'
group: SEATA_GROUP在
example/config/DatabaseConfiguration.java中配置jdbc:1
2
3
4
5
6
7
8
9
10
11
12
13
14
15
16
17
18
19
20
21
22
23package com.example.config;
import org.springframework.context.annotation.Bean;
import org.springframework.context.annotation.Configuration;
import org.springframework.jdbc.core.JdbcTemplate;
import javax.sql.DataSource;
@Configuration
public class DatabaseConfiguration {
@Bean
public JdbcTemplate jdbcTemplate(DataSource dataSource) {
JdbcTemplate jdbcTemplate = new JdbcTemplate(dataSource);
jdbcTemplate.update("delete from account_tbl where user_id = 'U100001'");
jdbcTemplate.update(
"insert into account_tbl(user_id, money) values ('U100001', 10000)");
return jdbcTemplate;
}
}在
example/AccountController.java中编写接口,删除对应账号中的金额:1
2
3
4
5
6
7
8
9
10
11
12
13
14
15
16
17
18
19
20
21
22
23
24
25
26
27
28
29
30
31
32
33
34
35
36
37
38
39
40
41
42
43
44
45
46
47
48package com.example;
import io.seata.core.context.RootContext;
import org.slf4j.Logger;
import org.slf4j.LoggerFactory;
import org.springframework.jdbc.core.JdbcTemplate;
import org.springframework.web.bind.annotation.PostMapping;
import org.springframework.web.bind.annotation.RestController;
import java.util.Random;
@RestController
public class AccountController {
private static final Logger LOGGER = LoggerFactory.getLogger(AccountController.class);
private static final String SUCCESS = "SUCCESS";
private static final String FAIL = "FAIL";
private final JdbcTemplate jdbcTemplate;
private Random random;
public AccountController(JdbcTemplate jdbcTemplate) {
this.jdbcTemplate = jdbcTemplate;
this.random = new Random();
}
@PostMapping(value = "/account", produces = "application/json")
public String account(String userId, int money) {
LOGGER.info("Account Service ... xid: " + RootContext.getXID());
if (random.nextBoolean()) {
throw new RuntimeException("this is a mock Exception");
}
int result = jdbcTemplate.update(
"update account_tbl set money = money - ? where user_id = ?",
money, userId);
LOGGER.info("Account Service End ... ");
if (result == 1) {
return SUCCESS;
}
return FAIL;
}
}
测试Seata事务
在nacos/bin目录下通过cmd命令行运行
startup.cmd -m standalone启动Nacos单机模式然后运行
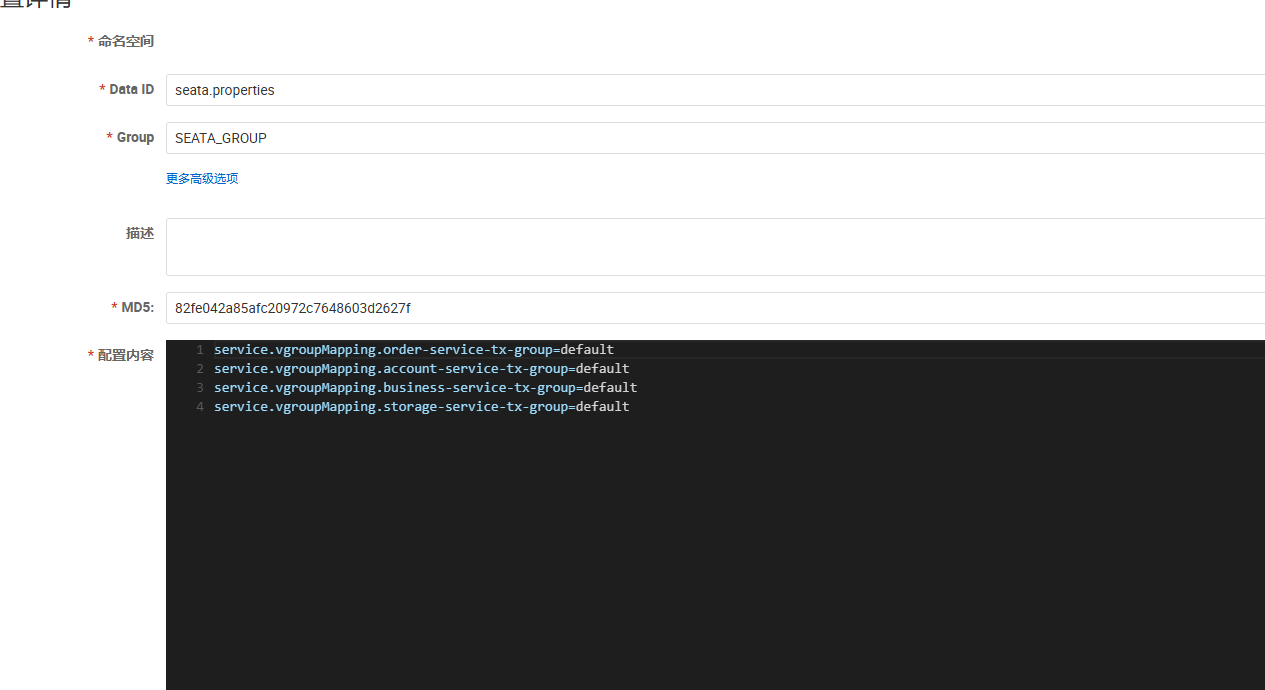
seata/bin/seata-server.bat文件,启动Seata Server在Nacos控制台创建配置信息:
运行
SeataAccountApplication.java,SeataOrderApplication.java,SeataStorageApplication.java,最后运行SeataBusinessApplication.java浏览器访问http://127.0.0.1:18091/seata/feign或者http://127.0.0.1:18091/seata/rest,验证:
- account-server、order-service 和 storage-service 三个服务打印的xid都相同,说明在一个事务中
- 数据库中账户金额、货物数量、订单数据,数据前后一致
- 当报错时,所有服务都回滚,数据库数据不变
限流降级:Sentinel
限流降级是什么?
在一个微服务调用链中,A调用B,B调用C,C调用D:A->B->C->D
如果服务D出现问题,变得卡顿迟缓,就会造成服务C对服务D的请求大量堆积,迟迟得不到返回值。服务C的大量资源耗费在苦苦等待服务D上面,就没有足够的资源处理服务B的请求,造成服务A对服务B的请求大量堆积,……
一个调用链上的某个服务出现问题,就可能会导致整个调用链上的所有服务出现问题,造成雪崩现象。
如果我们能够在服务D出问题时,一方面控制服务D不再接收过多的请求,保留有限的资源去自我修复;一方面限制服务C不再发送过多的请求给服务D,避免服务C的资源浪费。那么就可以在一定程度上缓解雪崩问题。这种方法我们称之为限流。
如果我们能够在服务D出问题时,让服务D不再对每个请求都正常处理(或者让服务C不再请求服务D),而是对部分甚至全部请求只进行简单处理,就快速返回(例如:直接返回一个“网络卡顿,请稍候重试”),那么就不会造成服务C对服务D的请求大量堆积,导致服务C的资源浪费,还能够让服务D保存有限的资源用于更重要的任务。这种方法我们称之为降级。
Spring Cloud Alibaba通过Sentinel来实现限流降级,其以流量为切入点,从流量控制、熔断降级、系统负载保护等多个维度保护服务的稳定性。
Sentinel实战
在父项目
SpringCloudAlibabaDemo下新建子模块SentinelDemo为子模块SentinelDemo添加依赖:
1
2
3
4
5
6
7
8
9
10
11
12
13
14
15
16
17
18
19
20
21
22
23
24
25
26
27
28
29
30
31
32
33<?xml version="1.0" encoding="UTF-8"?>
<project xmlns="http://maven.apache.org/POM/4.0.0"
xmlns:xsi="http://www.w3.org/2001/XMLSchema-instance"
xsi:schemaLocation="http://maven.apache.org/POM/4.0.0 http://maven.apache.org/xsd/maven-4.0.0.xsd">
<modelVersion>4.0.0</modelVersion>
<parent>
<groupId>com.example</groupId>
<artifactId>SpringCloudAlibabaDemo</artifactId>
<version>0.0.1-SNAPSHOT</version>
</parent>
<artifactId>SentinelDemo</artifactId>
<dependencies>
<dependency>
<groupId>org.springframework.boot</groupId>
<artifactId>spring-boot-starter-web</artifactId>
</dependency>
<dependency>
<groupId>com.alibaba.cloud</groupId>
<artifactId>spring-cloud-starter-alibaba-sentinel</artifactId>
</dependency>
</dependencies>
<build>
<plugins>
<plugin>
<groupId>org.springframework.boot</groupId>
<artifactId>spring-boot-maven-plugin</artifactId>
</plugin>
</plugins>
</build>
</project>配置
resources/application.yml:1
2
3
4
5spring:
application:
name: sentinel-demo
server:
port: 18097编写
example/SentinelConfig.java,配置Sentinel限流规则:1
2
3
4
5
6
7
8
9
10
11
12
13
14
15
16
17
18
19
20
21
22
23
24
25
26package com.example;
import com.alibaba.csp.sentinel.slots.block.RuleConstant;
import com.alibaba.csp.sentinel.slots.block.flow.FlowRule;
import com.alibaba.csp.sentinel.slots.block.flow.FlowRuleManager;
import jakarta.annotation.PostConstruct;
import org.springframework.context.annotation.Configuration;
import java.util.ArrayList;
import java.util.List;
@Configuration
public class SentinelConfig {
@PostConstruct
public void initFlowRules() {
List<FlowRule> rules = new ArrayList<>();
FlowRule rule = new FlowRule();
rule.setResource("HelloWorld"); // 与 @SentinelResource 的 value 一致
rule.setGrade(RuleConstant.FLOW_GRADE_QPS);
rule.setCount(1); // QPS 阈值为 1
rules.add(rule);
FlowRuleManager.loadRules(rules);
System.out.println("Sentinel 限流规则已加载");
}
}编写
example/HelloService.java,配置Sentinel资源:1
2
3
4
5
6
7
8
9
10
11
12
13
14
15
16
17
18
19
20package com.example;
import com.alibaba.csp.sentinel.annotation.SentinelResource;
import com.alibaba.csp.sentinel.slots.block.BlockException;
import org.springframework.stereotype.Service;
@Service
public class HelloService {
// 将方法标记为Sentinel的资源,起名为"HelloWorld",提供限流降级处理方法handleBlock
@SentinelResource(value = "HelloWorld", blockHandler = "handleBlock")
public void helloWorld() {
System.out.println("hello world - " + System.currentTimeMillis());
}
// 限流后的处理方法(必须与原方法签名一致,加上 BlockException 参数)
public void handleBlock(BlockException ex) {
System.out.println("被限流了!" + ex.getMessage());
}
}编写
example/TestController.java,提供测试接口:1
2
3
4
5
6
7
8
9
10
11
12
13
14
15
16
17
18package com.example;
import jakarta.annotation.Resource;
import org.springframework.web.bind.annotation.GetMapping;
import org.springframework.web.bind.annotation.RestController;
@RestController
public class TestController {
@Resource
private HelloService helloService;
@GetMapping("/hello")
public String hello() {
helloService.helloWorld();
return "success";
}
}启动程序后,浏览器多次访问http://localhost:18097/hello
可以看到Sentinel起作用了:

分布式消息:RocketMQ
分布式消息是什么?
在一个分布式系统中,多个微服务之间可能需要复杂的数据交互,数据有可能在传输过程中丢失、延迟、乱序等问题。如果每个微服务都需要自己处理数据传输的问题,还要与接收方统一数据格式,那么,重复性的代码就会过多,而且微服务间的耦合性也会变高。完全可以有一个独立的中间件,提供发送与接收数据的功能。
**RocketMQ**就是这样一个工具,他是一款开源的分布式消息系统。可以保证严格的消息顺序,提供丰富的消息拉取模式,高效的订阅者水平扩展能力,实时的消息订阅机制,亿级消息堆积能力。
RocketMQ实战
安装RocketMQ
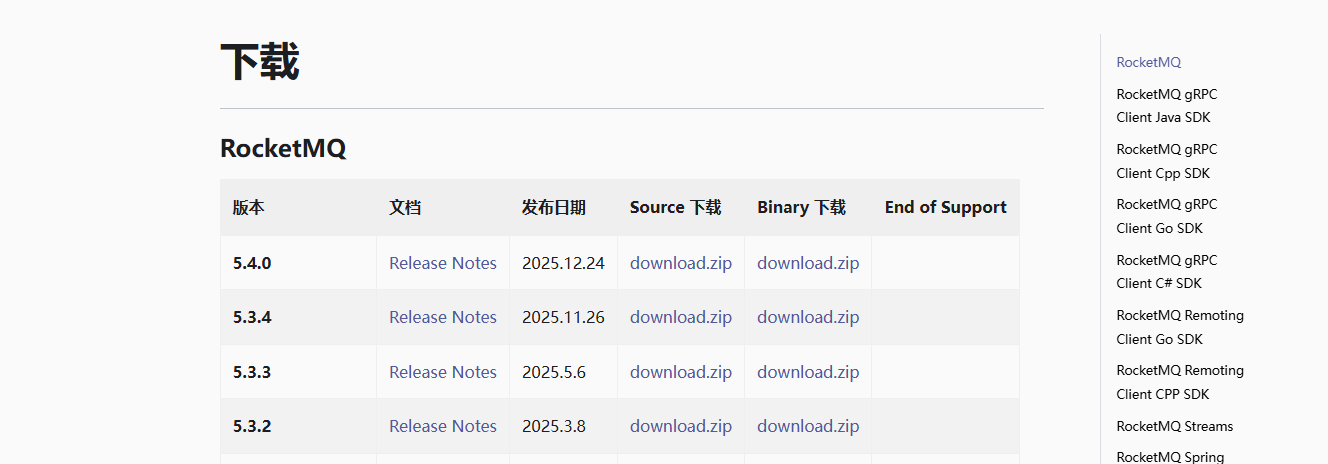
在RocketMQ官网下载RocketMQ 5.4.0版本二进制压缩包:
推荐在JDK>17下运行RocketMQ
在rocketmq-all-5.4.0-bin-release安装目录下,通过cmd命令
.\bin\mqnamesrv.cmd启动Name Server:
在rocketmq-all-5.4.0-bin-release安装目录下,通过cmd命令
.\bin\mqbroker.cmd -n localhost:9876启动Broker:
在rocketmq-all-5.4.0-bin-release安装目录下,通过cmd命令
.\bin\mqadmin.cmd updateTopic -n localhost:9876 -c DefaultCluster -t broadcast创建一个主题:
广播消费
在父项目
SpringCloudAlibabaDemo下新建子模块RocketMQProducer在RocketMQProducer中引入依赖:
1
2
3
4
5
6
7
8
9
10
11
12
13
14
15
16
17
18
19
20
21
22
23
24
25
26
27
28
29
30
31
32
33
34
<?xml version="1.0" encoding="UTF-8"?>
<project xmlns="http://maven.apache.org/POM/4.0.0"
xmlns:xsi="http://www.w3.org/2001/XMLSchema-instance"
xsi:schemaLocation="http://maven.apache.org/POM/4.0.0 http://maven.apache.org/xsd/maven-4.0.0.xsd">
<modelVersion>4.0.0</modelVersion>
<parent>
<groupId>com.example</groupId>
<artifactId>SpringCloudAlibabaDemo</artifactId>
<version>0.0.1-SNAPSHOT</version>
</parent>
<artifactId>RocketMQProducer</artifactId>
<dependencies>
<dependency>
<groupId>org.springframework.boot</groupId>
<artifactId>spring-boot-starter-web</artifactId>
</dependency>
<dependency>
<groupId>com.alibaba.cloud</groupId>
<artifactId>spring-cloud-starter-stream-rocketmq</artifactId>
</dependency>
</dependencies>
<build>
<plugins>
<plugin>
<groupId>org.springframework.boot</groupId>
<artifactId>spring-boot-maven-plugin</artifactId>
</plugin>
</plugins>
</build>
</project>在
resources/application.yml中配置:1
2
3
4
5
6
7
8
9
10
11
12
13
14
15
16
17server:
port: 28085
spring:
application:
name: rocketmq-producer
cloud:
stream:
rocketmq:
binder:
name-server: localhost:9876
bindings:
producer-out-0:
producer:
group: output_1
bindings:
producer-out-0:
destination: broadcast在
com/example/RocketMQProducerApplication.java中发送100条消息:1
2
3
4
5
6
7
8
9
10
11
12
13
14
15
16
17
18
19
20
21
22
23
24
25
26
27
28
29
30
31
32
33
34
35
36
37
38package com.example;
import org.apache.rocketmq.common.message.MessageConst;
import org.springframework.beans.factory.annotation.Autowired;
import org.springframework.boot.ApplicationRunner;
import org.springframework.boot.SpringApplication;
import org.springframework.boot.autoconfigure.SpringBootApplication;
import org.springframework.cloud.stream.function.StreamBridge;
import org.springframework.context.annotation.Bean;
import org.springframework.messaging.Message;
import org.springframework.messaging.support.GenericMessage;
import java.util.HashMap;
import java.util.Map;
@SpringBootApplication
public class RocketMQProducerApplication {
@Autowired
private StreamBridge streamBridge;
public static void main(String[] args) {
SpringApplication.run(RocketMQProducerApplication.class, args);
}
@Bean
public ApplicationRunner producer() {
return args -> {
for (int i = 0; i < 100; i++) {
String key = "KEY" + i;
Map<String, Object> headers = new HashMap<>();
headers.put(MessageConst.PROPERTY_KEYS, key);
headers.put(MessageConst.PROPERTY_ORIGIN_MESSAGE_ID, i);
Message<String> msg = new GenericMessage<>("Hello RocketMQ " + i, headers);
streamBridge.send("producer-out-0", msg);
}
};
}
}在父项目
SpringCloudAlibabaDemo下新建子模块RocketMQConsumer1在RocketMQConsumer1中引入依赖:
1
2
3
4
5
6
7
8
9
10
11
12
13
14
15
16
17
18
19
20
21
22
23
24
25
26
27
28
29
30
31
32
33
34<?xml version="1.0" encoding="UTF-8"?>
<project xmlns="http://maven.apache.org/POM/4.0.0"
xmlns:xsi="http://www.w3.org/2001/XMLSchema-instance"
xsi:schemaLocation="http://maven.apache.org/POM/4.0.0 http://maven.apache.org/xsd/maven-4.0.0.xsd">
<modelVersion>4.0.0</modelVersion>
<parent>
<groupId>com.example</groupId>
<artifactId>SpringCloudAlibabaDemo</artifactId>
<version>0.0.1-SNAPSHOT</version>
</parent>
<artifactId>RocketMQConsumer1</artifactId>
<dependencies>
<dependency>
<groupId>org.springframework.boot</groupId>
<artifactId>spring-boot-starter-web</artifactId>
</dependency>
<dependency>
<groupId>com.alibaba.cloud</groupId>
<artifactId>spring-cloud-starter-stream-rocketmq</artifactId>
</dependency>
</dependencies>
<build>
<plugins>
<plugin>
<groupId>org.springframework.boot</groupId>
<artifactId>spring-boot-maven-plugin</artifactId>
</plugin>
</plugins>
</build>
</project>在
resources/application.yml中配置:1
2
3
4
5
6
7
8
9
10
11
12
13
14
15
16
17
18
19
20server:
port: 28084
spring:
application:
name: rocketmq-consumer1
cloud:
stream:
function:
definition: consumer
rocketmq:
binder:
name-server: localhost:9876
bindings:
consumer-in-0:
consumer:
messageModel: BROADCASTING
bindings:
consumer-in-0:
destination: broadcast
group: broadcast-consumer在
com/example/RocketMQConsumer1Application.java中发送接收消息:1
2
3
4
5
6
7
8
9
10
11
12
13
14
15
16
17
18
19
20package com.example;
import org.springframework.boot.SpringApplication;
import org.springframework.boot.autoconfigure.SpringBootApplication;
import org.springframework.context.annotation.Bean;
import org.springframework.messaging.Message;
import java.util.function.Consumer;
@SpringBootApplication
public class RocketMQConsumer1Application {
public static void main(String[] args) {
SpringApplication.run(RocketMQConsumer1Application.class, args);
}
@Bean
public Consumer<Message<String>> consumer() {
return msg -> System.out.println(Thread.currentThread().getName() + " Consumer1 Receive New Messages: " + msg.getPayload());
}
}在父项目
SpringCloudAlibabaDemo下新建子模块RocketMQConsumer2在RocketMQConsumer2中引入依赖:
1
2
3
4
5
6
7
8
9
10
11
12
13
14
15
16
17
18
19
20
21
22
23
24
25
26
27
28
29
30
31
32
33
34<?xml version="1.0" encoding="UTF-8"?>
<project xmlns="http://maven.apache.org/POM/4.0.0"
xmlns:xsi="http://www.w3.org/2001/XMLSchema-instance"
xsi:schemaLocation="http://maven.apache.org/POM/4.0.0 http://maven.apache.org/xsd/maven-4.0.0.xsd">
<modelVersion>4.0.0</modelVersion>
<parent>
<groupId>com.example</groupId>
<artifactId>SpringCloudAlibabaDemo</artifactId>
<version>0.0.1-SNAPSHOT</version>
</parent>
<artifactId>RocketMQConsumer2</artifactId>
<dependencies>
<dependency>
<groupId>org.springframework.boot</groupId>
<artifactId>spring-boot-starter-web</artifactId>
</dependency>
<dependency>
<groupId>com.alibaba.cloud</groupId>
<artifactId>spring-cloud-starter-stream-rocketmq</artifactId>
</dependency>
</dependencies>
<build>
<plugins>
<plugin>
<groupId>org.springframework.boot</groupId>
<artifactId>spring-boot-maven-plugin</artifactId>
</plugin>
</plugins>
</build>
</project>在
resources/application.yml中配置:1
2
3
4
5
6
7
8
9
10
11
12
13
14
15
16
17
18
19
20server:
port: 28083
spring:
application:
name: rocketmq-consumer2
cloud:
stream:
function:
definition: consumer
rocketmq:
binder:
name-server: localhost:9876
bindings:
consumer-in-0:
consumer:
messageModel: BROADCASTING
bindings:
consumer-in-0:
destination: broadcast
group: broadcast-consumer在
com/example/RocketMQConsumer1Application.java中发送接收消息:1
2
3
4
5
6
7
8
9
10
11
12
13
14
15
16
17
18
19
20package com.example;
import org.springframework.boot.SpringApplication;
import org.springframework.boot.autoconfigure.SpringBootApplication;
import org.springframework.context.annotation.Bean;
import org.springframework.messaging.Message;
import java.util.function.Consumer;
@SpringBootApplication
public class RocketMQConsumer2Application {
public static void main(String[] args) {
SpringApplication.run(RocketMQConsumer2Application.class, args);
}
@Bean
public Consumer<Message<String>> consumer() {
return msg -> System.out.println(Thread.currentThread().getName() + " Consumer2 Receive New Messages: " + msg.getPayload());
}
}先启动RocketMQCosumer1和RocketMQCosumer2,再启动RocketMQProducer
可以看到两个Consumer的控制台中都打印出了消息。